
Contestants were asked to create a craft using burlap in some way. Vote for your fave at the bottom!
Outdoor Storage Box

Years ago our neighbors gave us this old milk delivery box that they had used at one time as a mailbox. I had always INTENDED to do something with it but it ended up in a corner of the garage where it remained until just a few days ago when I looked at it and thought, “Now WHY haven’t I done something with that?”. I gingerly pulled it out of the cobwebs and other assorted ‘things’ into the yard and slowly lifted to the lid. To my amazement, there was an old milk bottle in there! Both the bottle and the delivery box said, “Modern Dairy Elgin” on them.
I cleaned the can out, hosed it, let it dry in the sun and then using wire brushes, began removing the rust and corrosion. First I primed it and then sprayed it with several coats of a beautiful turquoise spray paint which really made the words on the can stand out!

I decided this would make a perfect little outdoor foot stool so I bought a yard of burlap, a piece of foam and some clear vinyl. I wrapped the foam in the vinyl and hand-stitched it. I did this in case the footstool gets wet, the foam won’t mildew. Using a rubber stamp, foam ‘brush’ and my acrylic paints, I stamped the flower image all over the burlap and then wrapped the foam with the burlap and hand stitched it in place. I used E6000 glue to attach the cushion to the lid of the box.
With the left over burlap, I sewed a ‘liner’ for the inside of the milk box. I cut two pieces for the front, two for the sides and one for the bottom. I stitched the four panels together and then stitched that ‘tube’ to the bottom piece. I covered a piece of cardboard with the extra vinyl and then wrapped and stitched burlap over that to serve as a ‘base’ inside the bag. I hemmed the top edge and to secure the bag to the top edges inside the box, I used E6000 glue to attach tiny, high-powered magnets to the four corners (since it’s a metal can, the magnets stick right to it!). I’m not sure what I’ll ‘store’ inside but if I decide I DO want to put anything in there, it will stay nice and clean.

Burlap Planter
Let me start by saying I LOVE burlap, so I was super excited when I found out that it would be our first challenge! I already use it around my house quite a bit, but I knew I had to come up with a fresh idea. Since I've been focusing on exterior improvements to our home, I decided to try and make a hanging wall planter. There are commercial products available, but they are super expensive! Burlap is breathable and made of natural fiber- so it's perfect for plants. I designed the planter with 6 extra deep pockets so I could keep the plants in pots. I have a little problem with keeping plants alive which necessitates the option of easy swap-age. You could totally put potting soil in the pockets for a more permanent living wall though! I hung my burlap wall-o-green out on our front porch from some existing hooks.


It's beautiful now, but when the plants grow it will be even more lovely!
For this first challenge, I chose to make a
Garden Caddy Bucket
I started with a coffee bean burlap sack that I got from a local coffee supplier.

I wanted to make it a bit more sturdy without adding bulk, so in addition to the burlap outer shell, I used a vintage (1970's~did I just call myself vintage?) upholstery fabric for the liner.

I did a break a needle trying to sew through all the layers of burlap (whoops), but improvised using a dull knitting hand-sewing needle and some yarn to close up the corners. That did the trick!

It holds everything you could possibly want while gardening. I have my gloves and hat, trowels and shovels, clippers and scissors. I even put an 8 inch pot in there!
This was a fun project that I know will get lots of use this season.
Outdoor Courtyard
Would you like to come over for coffee? We can sit outside in our new pretty courtyard.

The burlap project was very exciting for me because I had the perfect space for a transformation in mind. We have a really nice outdoor area that was not being utilized simply because we hadn't done anything to make it comfortable.
I started with our old dining room table from our last house. Years ago the seats had been covered in fun red fabric but those chairs were in desperate need of a makeover! The tabletop was pretty yucky too.
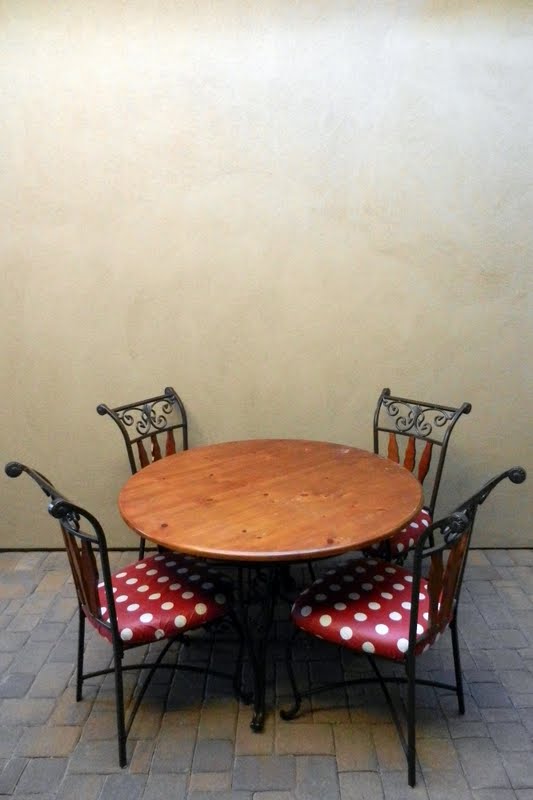
I primed and painted the wood on the table and chairs. Then I recovered the chair cushions with linen burlap. I used Mod Podge to add a some burlap fun to the top of the table. Who would Mod Podge burlap to a table?? ME. And I'm glad I did because I think it looks great! Lastly, I made some burlap flowers and painted them with water color. I had the wall art hanging in a different room in our house but it looks so much better in our new seating area!

I am looking forward to many summer mornings reading the newspaper and drinking coffee outside!
Preppy Burlap Summer Purse
Burlap projects have been all the rage over blogland and I have done my fair share of them overtime. I have to say the best projects I have come up with are ones that people say..."seriously you used burlap for that??? " Today, I hope I can impress you with my Preppy Burlap Summer Purse!!

A good purse is all about the details...Here are some of the details that make this purse unique!

One thing about me I am cheap!! I love it when I have an idea ( in this case a challenge) and I have everything on hand. It makes me feel like I am cheating the system because in my mind I am making something beautiful for free!!! The burlap was leftover from about a million other burlap projects I have done, the animal print lining was a remnant from my grandmother, and the handles were given to me by a friend. Score!!!
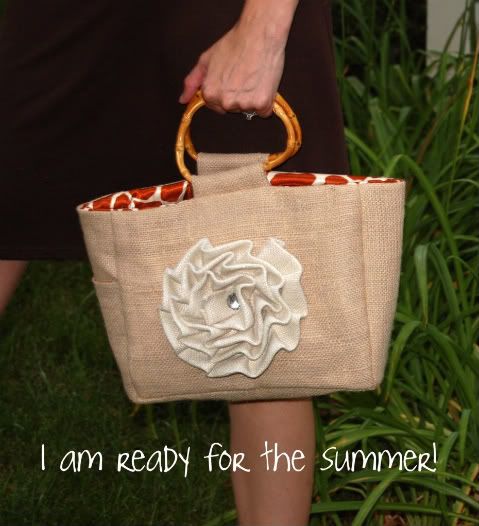 Thanks OMTWI for this fabulous challenge...I now have a (cheap) Preppy Burlap Summer Purse!
Ombray Chevron Bag and Clutch

For the Burlap Challenge, I came up with an Ombray Chevron Bag & coordiating clutch. This bag was made from white burlap and painted into Chevrons using an Ombray painting technique.

Both accessories are adorned with a coordinating brown burlap flower and blinged up in the middle with some matching beads.

I made the bag a bit bigger than I usually do, along with 6 pockets. This makes this bag and coordinating clutch perfect the take along for the Farmer's Market, Beach, or where ever your summer will take you!
Burlap Ruffled Curtains
I have moved into my house a while back and it came with the standard blinds you find in all rentals... I did take some fabric to cover the window, but now I have REAL CURTAINS!!!

I wanted a pop of color and not the typical "frilly" curtains and I think I definitely got that! Love the little details the eyelet gives in contrast to the burlap!


Summer Display
YAY FOR BURLAP! I had a fantastic time coming up with this weeks project. I wanted it to be summery but burlap kind of just says fall to me. Anyway this is what I came up with.
 |
This is actually going on my mantle but the weather is so bad I had to take the picture outside. I made burlap flower balls. I think they would look great as a topiary too.  |
Burlap-tastic Mirror
So, BURLAP. At first my brain instantly went to a cute burlap purse I had seen, but then again...I wanted to create something original that I hadn't done before. I started off by trying to redo the pillows on my couch. I wasn't thrilled with the idea, but it was a start. Then I saw the mirror leaning up against the wall taking up space. AHA. I could redo the mirror. So, I completely took it apart, covered it with burlap, and added some flowers and a sash. I made a disaster while doing this. I was covered in burlap. I must say, it tastes awful and I think it caused hives. But I AM DONE!! I hope you all like my burlap-tastic mirror.


And note to self: next time allow LONGER to edit pictures. Argh.
Burlap and Lace Mirror
For this challenge, I transformed the mirror that sits atop the dresser in my bedroom by adding burlap and a lace ruffle. I love the vintage and girly feel it gives not only the mirror, but the entire room- Although, I can't say my husband is on board with the lace, but it will grow on him ;)


I cut four strips of burlap and sewed them together. Next, I sewed on a lace ruffle around the inside of the mirror. Then with the help of lots of modge podge and hot glue I recovered the existing mirror which was way too brown and way too boring. I love the end result. I hope you do too.


I'm so excited to be here! Before I start I have a confession. I had never used burlap, I never wanted to, and well after this project I've changed my mind. I wanted to make something for my home that I would actually love and well I really love this Old American flag.

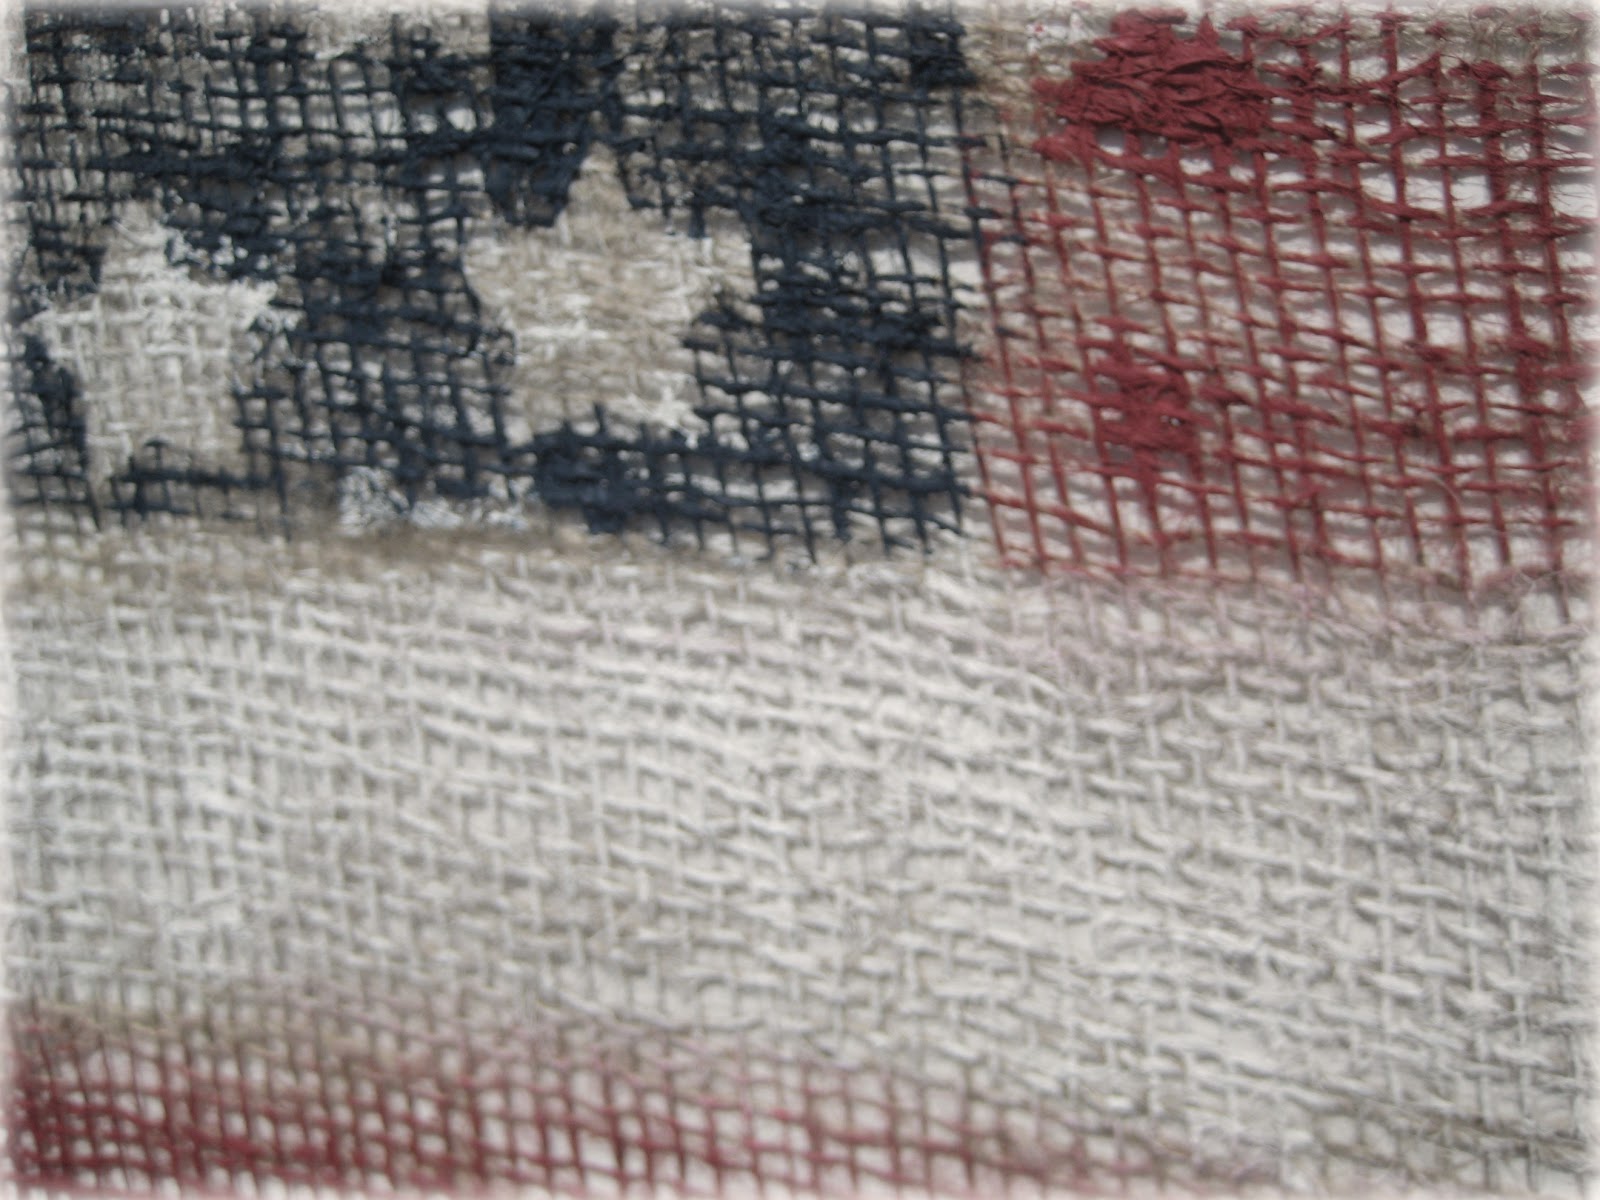
The size of the flag makes it the perfect statement piece for any room. It is hand painted on burlap giving it texture and a more rustic and aged look. The burlap also gives the appearance of a painted canvas. Its new spot is in the living room surrounded by family photos and I can't think of a more appropriate place. It reminds me of the love I have for my country and the gratitude I have for the heroes that fought and those that continue to fight for us. Its the perfect summer decoration or you could even use it year round.

Burlap Picnic Blanket
Nope. That's not some strange attempt at a burlap purse.
That, my friends, is a perfectly portable, easily cleanable, tres trendy burlap
picnic blanket with blanket weights. Lace trim adds the perfect romantic and old-worldy charm to this sewn
burlap picnic must-have. The weights are shaped like leaves and sport
grommets - as does the edge of the blanket - for easy on and off. Twine is
perfect for attaching the weights to the blanket - and complements the rustic feel.
This twine mimics the twine wrapped lace handle used to tote the blanket.
Spread it out on the table, on the grass or even on the
beach! With the handy weights that blanket won't trail off into the sunset or,
worse yet, flip dirt and grime all over your food. Need something to weigh down
your napkins, plates and cups? We all hate when those start flying. Just
detach one of the smaller leaves to do the trick.

It's stylish, oh-so easy to wipe down when finished, and folds up into a
tiny tote by tucking it all into the secret pocket on the back. The leaves fit nicely
inside the pocket as well, so everything is kept together.
Now go out there and enjoy the sunshine - in style!


Burlap Picnic Blanket
I'll be honest, I've NEVER worked in burlap before. What's
that? Did I miss the memo about how tres trendy burlap is in the craft world?
No, no... in fact I bought burlap in an array of colors. I've had said burlap
on my fabric shelf for about a year now awaiting... something. Some stroke of
genius. So I was glad for this chance to bust it out for the first time. But when I see burlap, my first thought is FALL, not spring and definitely
not summer. I really wanted to do a project that was timely and TIMELESS -
something I could use going into summer, but would still carry over into Fall as well.
I thought and thought and thought... (and then had to rush and rush and rush to
get it done...) You know what my favorite part of summer is? Well, besides the
absence of snow, wind and bluster... and aside from the sunshine and much needed
vitamin D... my favorite part of summer is PICNICS! I have loved picnics since
I was a little girl eating cucumber and cheese sandwiches with my mom at the park.
There is NOTHING like a picnic to enjoy the easy breeziness of summer.
And what do you need for any perfect picnic? A picnic basket, sure, but
this too:

Nope. That's not some strange attempt at a burlap purse.
That, my friends, is a perfectly portable, easily cleanable, tres trendy burlap
picnic blanket with blanket weights. Lace trim adds the perfect romantic and old-worldy charm to this sewn
burlap picnic must-have. The weights are shaped like leaves and sport
grommets - as does the edge of the blanket - for easy on and off. Twine is
perfect for attaching the weights to the blanket - and complements the rustic feel.
This twine mimics the twine wrapped lace handle used to tote the blanket.
Spread it out on the table, on the grass or even on the
beach! With the handy weights that blanket won't trail off into the sunset or,
worse yet, flip dirt and grime all over your food. Need something to weigh down
your napkins, plates and cups? We all hate when those start flying. Just
detach one of the smaller leaves to do the trick.

It's stylish, oh-so easy to wipe down when finished, and folds up into a
tiny tote by tucking it all into the secret pocket on the back. The leaves fit nicely
inside the pocket as well, so everything is kept together.
Now go out there and enjoy the sunshine - in style!

TIME TO VOTE FOR YOUR FAVE!!


