
Time to vote for you favorite week 2 project! The theme this week is Wear Green. Contestants were asked to create something green that can be worn.
Scroll down through the projects and vote using the poll at the bottom! :) All projects are anonymous. Poll will be open through Wednesday at 11:59 pm Central time. Come back Friday to see the winners revealed! And follow along with OMTWI so you don't miss the rest of the competition this month! :)
### TRYOUT FOR SEASON 2 BEFORE WEDNESDAY MARCH 16th AT Sugar Bee Crafts!!###

Project #1 - Wrap Around Dress
This week was very fun for me! I have had this dress in mind to make for a some time now and it was the perfect time to get it done.

I made a green wrap around dress (desinged by me), and yes it really does wrap around! I placed four small white buttons down the front and a snap on the inside to hold the dress bodice closed. The front side of the bodice has solid a green pipping lining the egde. The bodice is aslo fully lined.

The top part of the sleeves are gathered and there is a pleat at the bottom of the sleeve with a white fitted cuff. There is a green piping between the white cuff and the sleeve as well. At the top of the dress is a collar that wraps around the dress with the same green piping lining it. A dress perfect for the warmer weather coming this spring!
Project #2 - Lucky Dress

I love the Green theme this week! It's one of my favorite colors-so I picked out a cute green damask to be my starting point for my "Lucky" dress! A matching solid helped balance the pattern. It's a simple A-line dress with some tweaks and fun additions.
 I made this easy felt bow to coordinate with the dress-it has some hand stitching around the edge.
My favorite part of the Lucky dress is the pleated scoop detail in the front. It features a really cool technique for some pleats that look amazing! Bias tape was a big part of this dress too, I added it to the flutter sleeves, hem, around the scoop detail, and added a bow on top for good measure. :)
 The back closes with a series of fabric covered buttons-and the hem features a faux underskirt layer edged with bias tape as well. The dress is also fully lined with some bleached muslin.
The perfect little green dress for my "Lucky" little girl! (who does have a little Irish in her!)

I love the Green theme this week! It's one of my favorite colors-so I picked out a cute green damask to be my starting point for my "Lucky" dress! A matching solid helped balance the pattern. It's a simple A-line dress with some tweaks and fun additions.

My favorite part of the Lucky dress is the pleated scoop detail in the front. It features a really cool technique for some pleats that look amazing! Bias tape was a big part of this dress too, I added it to the flutter sleeves, hem, around the scoop detail, and added a bow on top for good measure. :)

The perfect little green dress for my "Lucky" little girl! (who does have a little Irish in her!)
Project #3 - Honey Bloom Dress
Nothing says March like flowers and green. I love the smells that arise in the beginning of spring time. The green grass, the new blooms, and little kids playing outside enjoying the fresh air. This was my inspiration for the wear green challenge. When I saw the challenge I knew right away that I wanted to make a little girl dress, my favorite craft to make.
I searched through my supplies and collected a variety of materials that I thought would work perfectly for this project. First I began with the base of the dress and I found the perfect print. Michael Miller Honey Bee Honey Bloom. Could the name say spring any better? I actually bought this material for another project but it was too perfect to not use for the challenge. Then I looked around for some inspiration and figured out how to make the dress special. I truly believe it is all in the details and that is what makes this dress different from any other.
I used a triangle lace trim that I got at a craft fair for $1 a yard, some small yellow roses, and some white ribbon around the arm holes to give it a charming touch. I also love pleats so I added 5 rows of pleats along the front of the dress and instead of letting them hang freely I decided to top stitch them down which creates a bubble effect on the bottom of the dress. After all this and some further evaluation I decided the dress was missing something. As I was milling through the options, (fabric flowers, another ribbon, some more roses, buttons maybe?) I decided a simple white ruffle around the neckline would be perfect. The ruffle is soft, and sweet. The perfect touch to a little girl's spring dress.


I asked my friend if her little girl would model it for me at a playdate. She loved how easy and comfy the dress was as she danced around for pictures. Another little girl at the play date liked it so much she wanted to be my model too. So I took some pictures of her in the same dress. I can't wait for my little girl to have her turn wearing it this spring.

Project #4 - Vintage Style Swimsuit
When I saw that this week's challenge was Wear Green, I wasn't sure what to do. Green is not one of my favorite colors, but I didn't want to spend time making something that would only be worn once. Enter the Vintage Swimsuit!

I decided make a swimsuit, because it's something I've been wanting to try and this seemed like a good chance. I googled "vintage swimsuit" to get some ideas, and came up with the design for this swimsuit. It features a halter top, ruching in the front and a ruffle around the bottom. And what would a vintage-style swimsuit be without the low-cut leg? It's actually two pieces, making potty breaks easier.

Of course a vintage swimsuit needs a vintage hair accessory! Some pink happened to be next to the green fabric from the swimsuit, and I kind of liked the color combination. The more I thought about it, the more I liked it, and this hair accessory was born.

The best part? She loves it, so I know it will be worn again and again!
Project #5 - Flower Necklace
For the "wear green theme" I wanted to make an item that I knew I would wear year around and not just for good ole' St. Patty's Day.

For this necklace I used leather pieces cut into flowers, the raised flower petals from a vintage necklace, pearls, scrapbooking flower embellishments, and a strand of Mardi Gra Beans that I picked up at an roadside antique show.

When I finished making this necklace, which required only superglue, I then cut out coordinating fabric for the back to give the necklace a more finished look. The fabric on the back also serves as a buffer between my clothing and the dyed leather.

Simple. Green. Stylish.
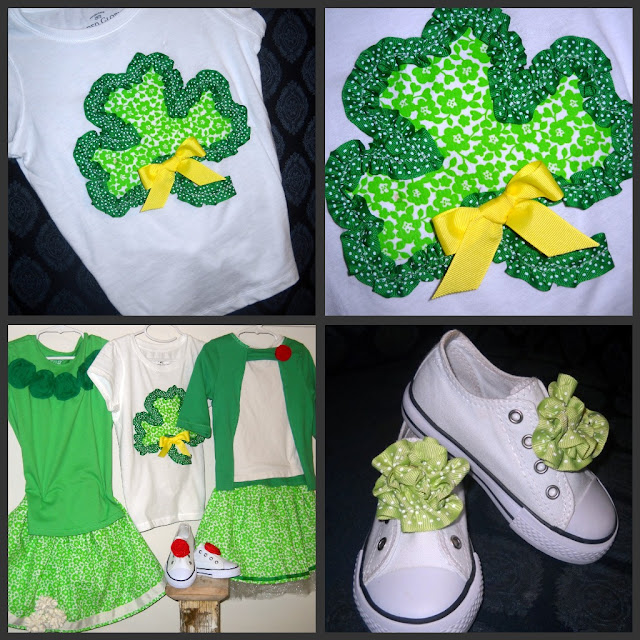
Project #6 - Green Family
What started out as my daughter's need for a " NO PINCHING" shirt erupted into a green fiesta! You see we have a small problem at our house, when you make something for one...you have to make for all.
 {That, and I was having a great time, it's been far to long since I've hung out with my sewing machine.}
I started by adding a hand drawn clover applique to a plain white tee and then outlining it with a super ruffled ribbon. I think my girlie is officially clear of the pinching...
Skirts came next, I went patternless and was super happy with the results. A few more altered tee's, one turned cardi with a snap-close collar and change-able rosette for a spot of color. And the other with a fun emerald green row of layered and rolled fabric flowers.

Then came the shoes....{I have to tell you, I'm feeling kinda smart about this one! I LOVE it! And best part, my little one is keeping her shoes on because she too LOVES them.}

Ta-Da! Shoes that match EVERY outfit with a simple little snap. This challenge was a ton of fun! We are happily wearing green at our house. Project #7 - J Crew Tshirt Dress The Week 2 theme was "Wear Green". Whether that is interpreted as the color green, or as being eco-friendly, I accomplished both! I refashioned a former favorite shirt of mine into a dress for my little girl! The shirt is a little short for my current taste, so perfect opportunity to turn it into something adorable for her! 
I found a dress on J Crew that I found absolutely adorable and used as my inspiration piece! By using a t-shirt of my daughters, I created a pattern to cut the shirt down to her size. The length was perfect for a dress. I guessed at where her hips were to add the drawstring waist. The t-shirt had a pocket, which added the perfect visual touch in my opinion, but the inspiration piece had a flower, so I wanted to make one. I put it on a clip so that I could either clip it to the pocket on the dress, or I could instead clip it in her hair and have a great matching barrette! The flower was made of leftover fabric from the dress and ribbon used for the drawstring! 
My little girl had fun dancing it out for our modeling session. 
Love the little dress and how cute and trendy it is on her...now where to find a large enough t-shirt to turn into a dress for me? :) Project #8 - Green Beaded Jewelry With the theme "Wear Green" there were a lot of directions I could have gone with this. In fact, I actually started two other projects and pulled out lots of supplies for a few other other ideas! Green to me is more than a color but reduce, reuse, recycle as well. Finally I decided I'd go the accessory route and dug into my stash. Using left overs from past projects, a few beads from a broken bracelet and some polymer clay I set out to create a chunky triple strand necklace with multiple options. 
Each strand can be worn separately; one is simply strung, one is bright wooden beads knotted with ribbon and one is hand wrapped with shiny green wire. 
Magnetic clasps allow for versatility beyond St. Patrick's Day. Layer two or three strands or twist them together for a super chunky look. 

I started by adding a hand drawn clover applique to a plain white tee and then outlining it with a super ruffled ribbon. I think my girlie is officially clear of the pinching...


I bought a pair of white slip-ons and sewed on a snap to the tongue of each shoe. Then whipped up a bunch of ribbon flowers/pom poms in different colors and sewed on the snap back to them.


Project #9 -- Hooray for Spring Dress
With this week's "green" theme, I wanted to focus on something that could be worn all through the spring and summer season, instead of something just for St. Patty's Day.
I planned and half designed three separate outfits before I decided on the direction I wanted to go in this week. The end result is super fun!! So girly, but not so dressy that you can't have a good time on the playground.

The shirt is purchased, then embellished with flowers made from jersey and little green (and the occasional yellow) beads. The skirt, however is made (and designed by me) from scratch. It originally was planned to be just layers of the green jersey, but as I was making it, it needed a little something "more". That "more" came in the form of a layer of chiffon and two layers of a pretty damask cotton. Plus a rolled rosette as an accent.
Would you like to see some close ups of the details? Ok! Here ya go!!

Isn't my little model so cute? :) I asked her if she was doing the "Pledge of Allegiance" in the picture just above. She said, "Yes." I love little kids!! :)
Tangents aside, I have to say that I love how this week's project turned out! I want to make a big(ger) one for me!

HOORAY for SPRING!!!
Time for vote for your ONE favorite project!
Come back Friday to see the winner!! :)
I voted! Good luck everyone!
ReplyDeleteCute projects -- best of luck to all!
ReplyDeleteIt was so hard to decide this week!
ReplyDeleteWow - cute projects!! it was hard to choose!
ReplyDeleteGEEEZ! Could it be any harder to pick just one! Amazing and Creative!
ReplyDeleteSo hard to choose this week, but I did it! Good luck y'all!
ReplyDeletereally? just one? I honestly LOVEd at least 4. holy crap. good round!
ReplyDeleteWow! Awesome job, ladies! Loved them all!
ReplyDeleteIt's great seeing all these creative Wear Green projects!
ReplyDelete