
Week 1 - Wall Art - vote for your favorite! (poll at the end of the post)
Laundry Room Wall Art
I'm so thrilled about the Week One challenge of Wall Art! I LOVE making wall art especially with items I have around the house! I knew just the perfect thing I have been wanting to make for my laundry room.... Here is my Laundry Room Wall Art...

I used a piece of left over wainscoting to make 4 frames. I had a 5ft x 13inch piece that I cut into 4 equal sections and then framed out with 1x2 MDF.
I take some of my son's tiny clothes including the gown he came home from the hospital in and glued them on the frame.
I then gave the clothes a thick coat of some leftover white paint.
{It would have taken too many cans of spray paint without this step.}
The clothes really soak up the paint.

Then the last step I gave each one a couple coats of white spray paint.
Three are hanging in the laundry room and one on the door....
 Precious baby clothes forever preserved!!
 Jenga Mirror

Wow, I think I am still in shock that I get to compete with all these wonderful ladies! I wanted to stand out yet stay true to my cheap thrifty way of crafting. I decided I would search the Internet for inspiration. I came across a one of a kind mirror that was made with wood planks and for a reasonable $120.00 it could be all mine!!! Yep, soooo not in my budget so after studying it for a while it came to me. The wood planks looked a lot like Jenga pieces!
I searched my house and came up with a mirror with a broken frame (perfect) an old cork board (for the back) and a Jenga game (woohoo!)

I picked my colors and went to painting. Next up I cut about 1/3 of all the pieces to make it so it would stagger the pieces. then glued them to my cork board. I decided it was a little to bright and new for my taste so I simple sanded and distressed with some glaze. I could not be happier with the results!

What do you think? Worth $120.00 bucks? Maybe not but it defiantly was worth the price I paid FREE!
Hopefully I will see you next week ;)INTERACTIVE MAP
This map creates a fun, cute way to track your travels across
the wonderful USA!

All you need is a cork board from Good Will ($2.99), pencil, sharpie, ribbon, pins, stapler, and a Dremel [the fun, hand held power tool that cuts through e v e r y t h i n g!] Oh yea...you can't be a perfectionist because you would drive yourself mad trying to outline the states!

Basically, once you get your outline drawn on with sharpie, cut it out with the Dremel... Then draw in your states, make your little pins [I used a Silhouette to cut out the flag shape], staple the ribbon to the back of the cork board, and hang :)

Now, start tracking your travels and pinning them up :)
We have this funny wall over our stairs that needed some art work. I wanted something that would be inspirational as my kids walk downstairs to start the day. This is what I came up with:

The quote is from a talk given by Gordon B. Hinckley during my senior year at BYU. I wanted to have my children think about going beyond just being good, although sometimes that's a struggle all it's own.

The lettering and trunk were printed with hand-cut freezer paper stencils. The leaves are appliqued circles, arranged by shade. The sky and grass are represented by pleated fabric. I also added some machine quilting around the truck (adding some branches), and around the leaves. For a finishing touch, I added a little bee, made with scraps of felt, lace, and ribbon with a button head. There are a few whispy lines to show where the bee has flown.

Hopefully it will serve as a good reminder each day, for all of our family.
Not Your Grandma's Doiles
Ah the first challenge! My home is in much need of wall art, so the thought of having an excuse to sit down and do something for myself thrilled me to no end. So I knew I had to come up with something that I would just absolutely love and would fit in my home and make me smile every day. I'm a little bit funky, but I love family and heritage and tradition. Its been very hard for me to settle on a style in my home because I'm such a quirky mixture of old and new, but I think what I came up with will bring me smiles every morning. So without further ado, I give you "Not Your Grandma's Doilies!"

Ok, so maybe they ARE your Grandma's doilies (or in my case, someone else's Grandma's doilies bought at a resale shop, because my Grandma put her foot down and nearly spasmed when I said I wanted doilies from her stash to glue...), but I'm in love.
I took 3 hard flat canvases (a very technical term right there), and painted them in 3 bright and cheery colors I had on hand. I sugar starched the 3 doilies to get them as stiff as I could, so it would be easier to glue them onto the canvas. I was planning to spray glue them on, but decided at the last minute that it might make it too messy or destroy the paint on the canvas, so I painted the doilies with glue and just pressed onto the painted canvases.

To hang them up I just hot glued a saw tooth bracket to the back, and a small piece of wood on each so that it wouldn't hang unevenly or oddly.

I am very happy with how they turned out, and I think it was something simple to make that is really going to be a wonderful addition to my home. Thanks for giving me an excuse to do something for myself!
Wine Cork Frame and Quote
I am pretty excited about participating in One Month To Win It, and particularly happy about this week's theme of Wall Art. I have been kicking this idea around for several months and this is perfect timing!
A few years ago I bought a friend a birthday card that said "Always carry a corkscrew and the wine will provide itself". As much as it was the perfect card for her, it also resonated with me for a couple of reasons...
- I really like wine
- It reminds me to be ready for opportunity when it knocks on my door
- It reminds me to have faith that things will fall into place
- I really, really like wine
 For my Wall Art challenge I made a distressed painting with this phrase and created a "mat" out of wine corks.
 Starting with a $5 thrift store frame, I had it fitted with a piece of 1/4 inch plywood (1) then primed it and painted it a golden-taupe color (2). Next I used my Cricut to cut the letters out of contact paper (3) and adhered them to the board. Sage green paint went over the whole piece (4) and then I free-hand painted a wine bottle right over the top of it all (and like a dork, did not take a photo of this part.) While it was still wet, I peeled off the letters (5) and fixed any places where the paint pulled up. When it had dried completely I went over it with the hand sander to get the distressed look I wanted (6) then put a metallic gold wash over it (7). Figuring out the placement of the corks was quite a puzzle, so once I got them in the pattern I wanted, they were wedged and glued into place one at a time (8). Then to make sure they were really secure, whatever was handy and heavy was used to weigh them down while they dried (9). (In this case, Mexican Train Dominoes and ceramic candle holders.)
I hung it against a green wall in a funny little niche that is always tricky to decorate because it is small and rather dark. This feels like it works here because this art seems to add more texture than it does color, and it has created sort of a layered look.
 You all know the drill: Please click on any picture to enlarge it.
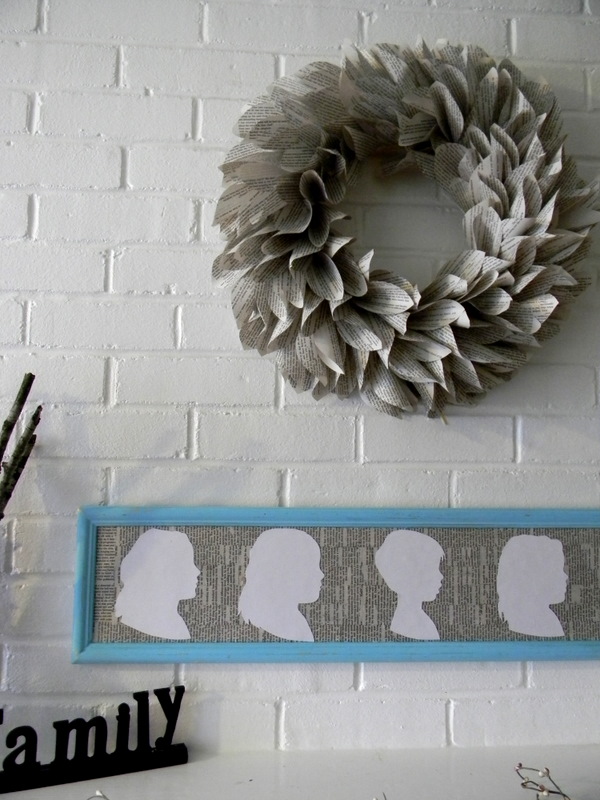
Book Wreath and Silhouettes
My husband and I like to read books together.
It's good wholesome bonding time. Unfortunately
our last book turned out to be really dumb. The
plot was terrible, inconsistencies were rampant
throughout, and the main character was a goober.
So, I ripped it up and put it to better use.
These days I'm an adoring fan of silhouettes. They're so
simple but capture so much! I created some silhouettes
of some of my favorite people. After framing, painting,
and applying said terrible strips of book onto the front of
my plaque, I mod podged my little lovelies side by side.

I had a couple hundred pages left so I made a wreath.
This is my spin on the ever lovely book wreath.

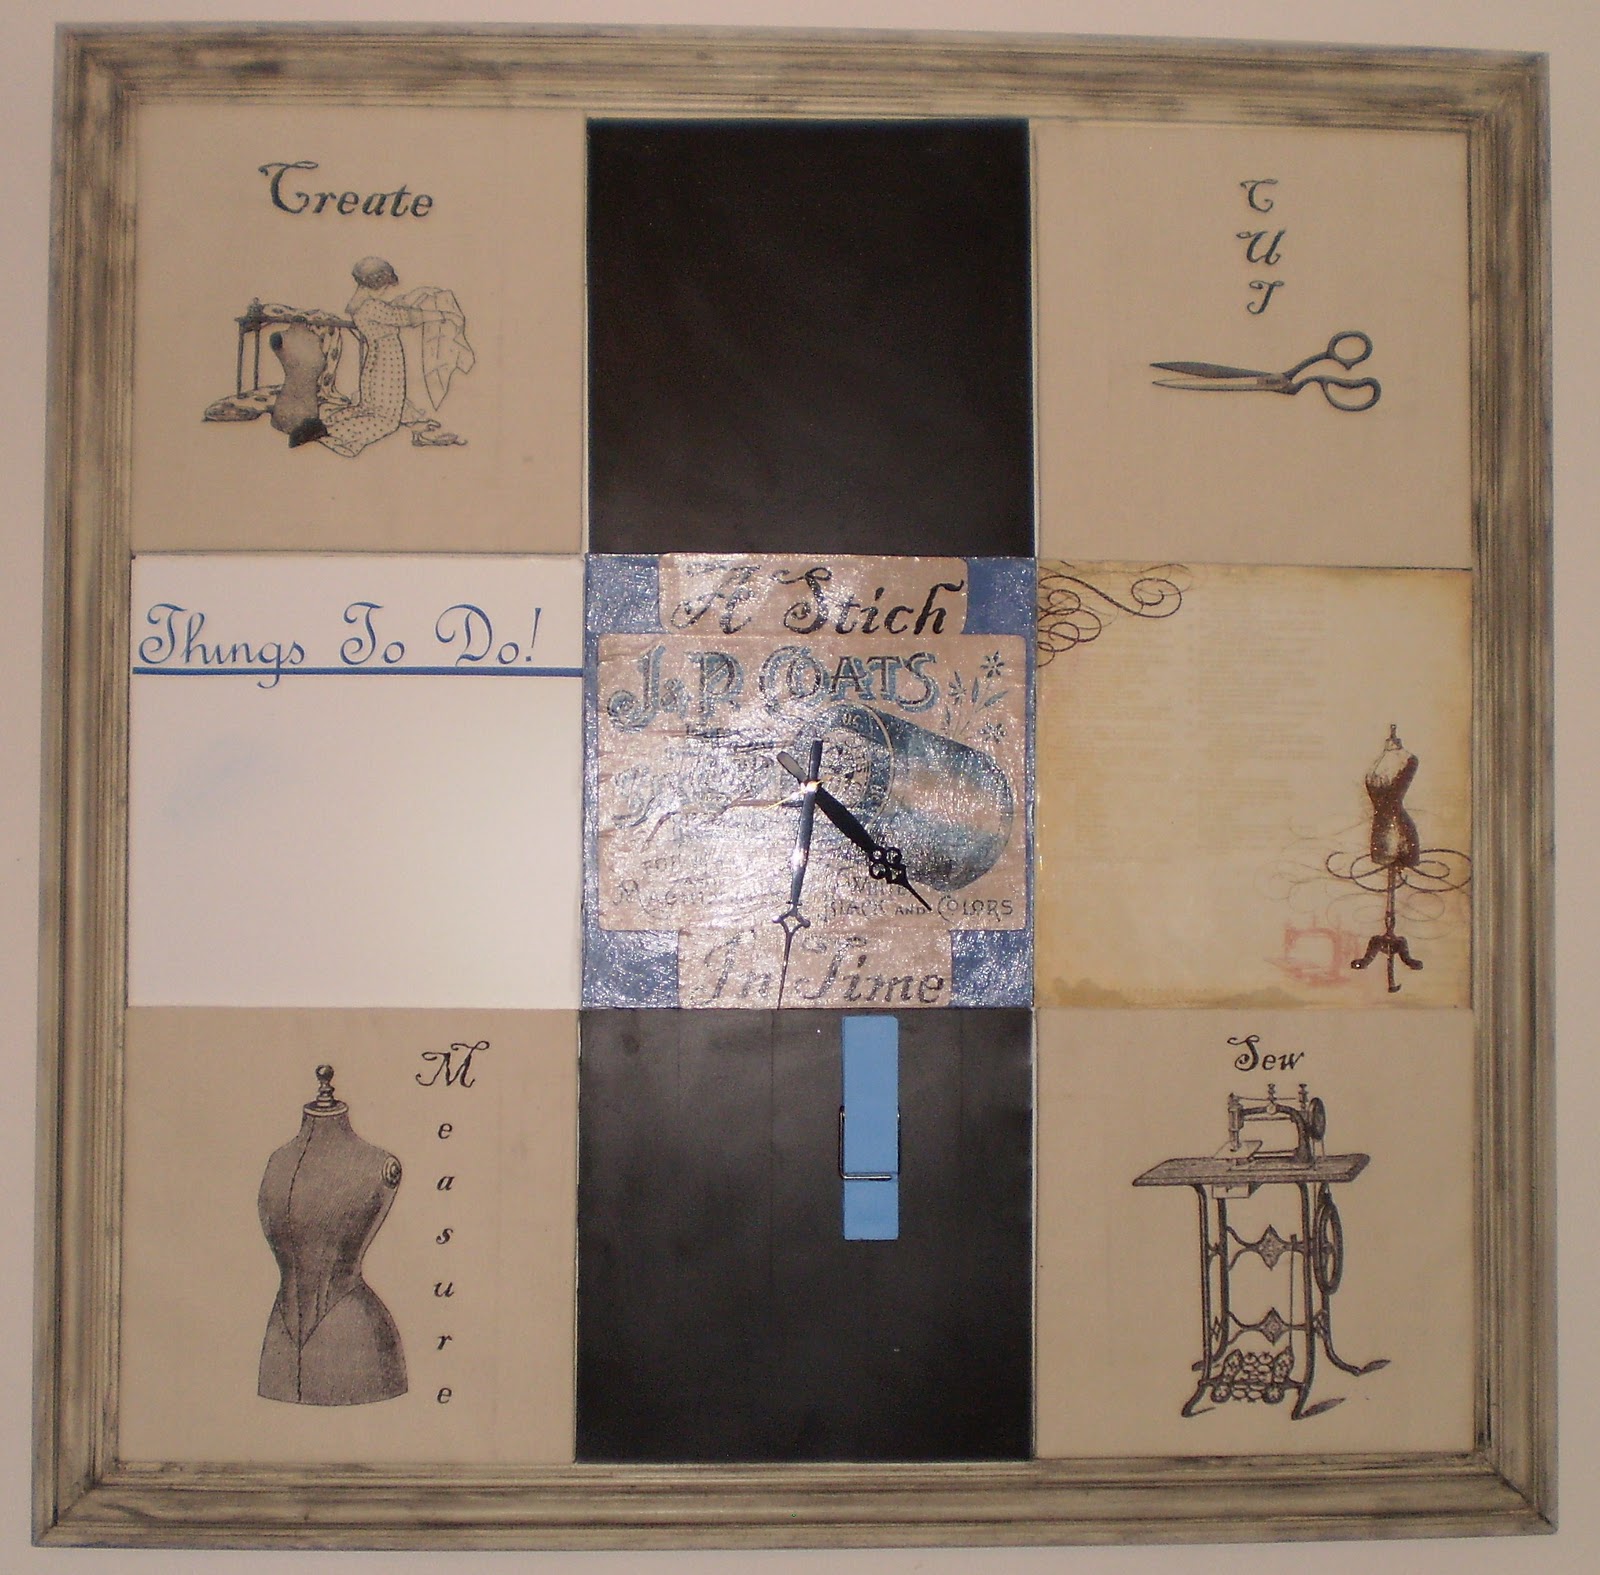
Memo Board


My ulitmate favorite piece is the middle tile my clock. When it comes to crafting I always loose track of time and I knew that I needed to incorporate a clock on my board. I spray painted it then mod podged the image on, drilled a hole and placed my clock mechanism on it.

My frame was made by cutting press board molding and gluing it onto the left over white board. I put velcro on the back of each of the tiles and the white board so that I can move and switch out the tiles whenever I feel the urge. Who wouldn't want this memo board in their crafting room?
Mini Art Gallery

Wow, Week 1 already! When I heard that the theme for this week was "Wall Art", my first thought was "oh, crap"! I have never made any art for our wall, unless you count putting a picture in a frame and hanging it up, and we really don't have that much wall space to work with. After much contemplating it finally clicked, and I thought what better wall art than, well, ART! My daughter has been begging me for a place to hang her artwork (other than the fridge, ya know), and her playroom had just about the only blank wall left in the house. Perfect opportunity! Also, this is the only room in the house that's still "new house beige" in color, so it could definitely use some sprucing up! Thus, I give you the Mini Art Gallery:

For the gallery I knew I wanted a place to clip pictures, as well as a few frames. I also wanted it to be easy to change out pictures for my little artiste who cranks out pictures like nobody's business!! For the A-R-T letters I purchased basic chipboard letters, painted the edges and inside pink, then mod podged some fabric that my little one picked out to the top. I then added some rolled rosettes out of the same fabrics to add a little something. To finish that part I hung up twine in between the letters to clip pictures to. For the two hot pink frames (artist's design choice...haha) I attached two pieces of 11x14 plexiglass together at the corners (left the top and sides open) and hand cut hot pink adhesive vinyl into a cute frame shape then attached it to the edges of the front piece of plexiglass. This made a cute little display that was easy to get pictures in and out of, and still made the pictures look framed. In the center I framed one of my favorite drawings that my daughter did last summer at almost 3 years old (that she decided to name "boy with the glass slipper"...don't ask, I have no idea...). And, no gallery would be complete without information about the artist would it?? I think not, so I created an "About the Artist" page in Photoshop and placed it inside the bottom frame including name, birthdate, picture, and bio (to include her favorite mediums of watercolors and glitter pens). And, that completes the art gallery!

Now all that's left to do is stand back, admire your work, and contemplate what to create next!
Numbers and Letters Wall Hanging

I've been thinking about making something for the wall of our playroom for awhile now so I was excited to hear the theme for this week! I wanted to come up with something fun, colorful, and maybe even a little educational so I designed this numbers and letters wall hanging.

For the framed part, the numbers are appliqued onto the background which is trimmed in bias tape and ric rac. There's a thin layer of batting underneath to give it a little dimension. Hanging below are six strips of ribbon finished off with a black bead at the end. They feature letter blocks that I designed and printed onto card stock.

The family is really enjoying how much this brightened up an empty wall and it'll be helpful for teaching letters and numbers as our kid (and future kids) get older!
Bathroom Wall Art
I gotta say that I LOVED this project! It was just the motivation I needed to swap out the generic wall art I had been frustrated with in my half bath for the last few weeks!! Nothing like a little competition to kick your butt in gear, right?
I had two walls to work with. For the first wall, I chopped a scrap board into three identical pieces, painted them an off-white acrylic paint, and then penciled in a piece of coral I just kind of eyeballed from an online inspiration! Painted it a few different colors before ultimately finding the perfect shade of coral...what a pain! But then I took two old 5-gallon paint sticks and screwed them into the back and put a coat of poly on it, and I'm loving how it livens up my room! So worth the effort!!


Rosette Initial
Hey everyone! I am so excited to be a One Month To Win It contestant! Woo hoo! :)
Today I am going to show you how to make your very own rosette initial! These make great gifts! I am making mine for a friend who just had a little girl!

Ready? Let's start!

Step #1... Get a sturdy sheet of cardstock or cardboard.
Step #2... Draw and cut out your initial. You could also do a whole name!
Step #3... Cover the initial with the fabric that you are going to use for your rosettes.
Step #4... Cut strips for your rosettes. Mine were about 2 inches X 30 inches. I used 17 of them.
Step #5... Tie a knot at the end of your strip and start rapping the fabric around it!

Step #6... Keep rolling and rolling until your rosette is the desired size.
Step #7... Secure the end of your rosette with hot glue, fabric glue, or you could even just stitch it down.
Step #8... Apply a generous amount of hot glue to the back of your rosette and press it onto the letter.
Step #9... Keep adding rosettes until your letter is completely covered.
Step # 10, cut off the excess fabric, and you are done!!
Then hang it on your wall, and enjoy the beauty! :) Wasn't that easy?!
Vote for your favorite project - voting ends Wednesday evening!
Good luck everyone, I voted! Great projects!
ReplyDeleteWow, so many great ideas! Good luck everyone.
ReplyDeleteI loooooove the jenga mirror :) SOOOO creative...i can't wait until my son stops playing with his jenga game so i can make this...lol
ReplyDeleteAmazing projects! You ladies are brilliant!
ReplyDeleteHoly smokes you gals rock!! Good luck everyone.
ReplyDeleteWait, do I have to vote for only one? I love every single one of these!
ReplyDeletetoo many great choices!
ReplyDeleteGreat projects! Good luck to all of you!
ReplyDeleteI have to say I loved the wine cork project but I would have to admit I have a box full of corks to use up.
ReplyDeletejust voted. how FUN!
ReplyDeleteSo many creative ideas! I have found some fun inspiration. :)
ReplyDeleteLots of great ideas, it was really hard to pick just one!
ReplyDeleteGreat projects, what a talented group of crafters!
ReplyDeletewonderful inspiration, hard to pick the best
ReplyDeleteI seriously LOVE all of the projects!!
ReplyDeleteI see several things I would like to try in my house! Thanks for all of the wonderful ideas!