
Quilted Keepsake Pillow
I am thrilled to be participating in One Month To Win It and am in love with this weeks theme! I'm a scrapbooker. Preserve a Memory? Toss me some patterned paper, a little glue stick and I'll show you a preserved memory! But wait... isn't the picture below a quilted pillow?
Don't we all have boxes of 'keepsake' clothes? Cute little sweaters, tiny little Gap jeans or a prom dress {or two}? Wouldn't it be great if we saw those things more than once a century?
I thought so.
A close friend asked me if I could do something with this adorable hoodie that her son loved.
How could I say no? So I put down my paper cutter and hauled out the sewing machine...

Using a 12 month sized hoodie, a couple of 24 month sized onsies and a size 3 toddler t-shirt I came up with this Quilted Keepsake Pillow {say that three times fast}. I don't think that I can give it back to my friend. Honestly, can't I just tell her that I lost the hoodie? I love this pillow that much!

whew now I remember why my quilting was 'back in the day'.
Not to worry. I'll be posting the full tutorial on my blog.

So worth the pay off! I freaking love this pillow!!! {Have I already said that?} Total bonus that I ended up with a Chevron pattern in the front. I used the front of the little hoodie for the back of the pillow. The zipper still works and was really useful when filling the pillow with stuffing! You could even take the stuffing out and use this as a tooth fairy pillow or keepsake bag.
I hope that you have been inspired and love this as much as I do.
Silhouette Charm Bracelet

Silhouettes are everywhere and they are only getting more and more popular. When I was seven years old my 2nd grade teacher made silhouettes of each child in class. I still have that construction paper silhouette of my chubby little face and long, braided hair. I love it. Silhouettes are timeless and classic. They preserve a memory of what a child's face is like when it is rounded by the softness of youth. They capture little baby curls that will someday be made straight with a flat iron and cowlicks which will soon be tamed.


Mother's Day Necklace


I wanted to create something different and unique. To be quite honest when I first read "Preserve a Memory" I was at a loss for what to do. I knew what I didn't want was the obvious, a picture frame.
My aunt has a charm bracelet that only has little gold charms with each of her children's names and birthdates engraved on them. It has grown and been expanded to include her grandchildren and even a couple of great-grands.
Which got me thinking, "Why not make a necklace like that?" Only this time I would include the Mommy and her little ducklings trailing along behind her.
I started by picking out a large pink rose that I crocheted and three little crochet roses (I'm partial to 3 since that's how many my family has, but really any number would work) in white and two pink shades. I arranged them on my handy dandy bead board and started digging through my bead stash only to find these pretty green beads that look like leaves. I added some chain for each side and was pretty darn proud of myself. I strung everything together with a combination of eye pins, jump rings, and patience (sometimes those things slip right out of where you want them to be!).
And viola, I made a Mother's Day Necklace with Mommy and her three little flowers.

Important Dates Tree

*FYI: Black stars are hiding personal info that cannot be displayed in the contest*
I loved this week's theme of "Preserving a Memory". When I first found out I was chosen and what the first theme was, my mind literally went BLANK. I couldn't think of a single memory I had ever had! I had crafter's block and I had it bad. I decided to leave my house and go visit my sister before I completely lost my mind. On the way to her house I started thinking about a family tree of some sort on wood. Then we went to an antique store because that's where my mind is happiest! There I found beautiful old windows and my crafter's block vanished. Yes, this was exactly what I needed to preserve my memory! But instead of a family tree, it became a date tree for my husband and I. It's filled will all the important dates we've had so far and we have more leaves and limbs that we can add on for future dates.

Here's how I made it:
#1) I painted the opposite side of the window pane a beautiful blue gray. I did two coats, kept them imperfect so that you could see subtle brush strokes and light through the window pane.

#2) I measured the window pane to see how large to make my vinyl tree. I found the center and marked it using a dry erase marker.
#3) I designed the tree on SCAL and used my "baby bug" Cricut to cut it out. That's right ladies, I used the 6x12 inch Cricut to cut this huge tree out! It can be done! Just in sections. It really didn't take very long.
#4) I added very very tiny dates and words to the branches, for example "First Kiss June 5, 2001" The hardest part of the project was this step. Because the letters and numbers were so small, they were pretty hard to cut out and place on the glass but it was worth it!
I am thrilled with how it turned out and how easy it was! It's something I will keep forever and can't wait to add more dates to it!
Family History Story Books
I'm not much of a scrapbooker and our most recent family photos are seriously outdated, so I was a bit stumped with the preserving memories theme at first. But after some brainstorming, I came up with a way to pass on my parents' and grandparents' memories and stories to my kids.

Using personal histories of my grandparents that I had previously recorded, I made storybooks for my kids. I typed up a few of my grandparents' stories and added pictures to illustrate. I bound the stories and covered them with clothbound hard covers. The covers got some freezer paper love--one stenciled and one printed directly on the fabric.


Cherry Tree Box
This is the memory of an old cherry tree.
Whose life had come to an end,
and had to be cut down.
and had to be cut down.
 Being full of memories,
it was a sad day.

delicious cherry's,
tree houses,
tire swings,
climbing,
and relief from the sun.
 Now with the help of my handy man,
the beauty has been preserved.
To enjoy and remember for years to come.
As a wall hanging,
or a mantel decoration,
on a shelf,
or adorning a side table.
It will be remembered.
(special thanks to my niece for the timeless pictures of the tree!)
Memory Hall
I am so honored to be chosen as a contestant for Season 3 of OMTWI! When I heard that the theme was "Preserving a Memory", my first thought was a memory, just one?? How can I choose just one memory? So, I decided why choose one, how about 10.
So, I give you my Memory Hall. My favorite moments of all time. No boring portraits or fake smiles here, all of the pictures I chose are real moments that represent something to me. I can't think of a better way to give life to the hall in our home.
 How I did it:

-I started by painting our hall Slate Grey.
-I added a chair rail, painted it white and hung it at eye level.
-Collected different sized frames (super cheap from Good Will) primed them then painted them bright colors
-Printed out my "Favorite Memories" in black and white
-Hung the pictures to the wall, with the bottoms resting on the chair rail

I love the way it turned out, now I am reminded of my favorite moments everyday,...
First Waves, First Dance, First Breath
 Hope to see you next week!

Footprint Shadowbox
I had a hard time deciding what to make for this week's theme of preserving memories. There are so many memories that I want to hold on to, but maybe nothing so special as the day our daughter was born. It is amazing how quickly she has grown from a tiny little baby into a babbling, crawling, laughing little girl. I remember when I was first holding her and thinking how tiny her hands and feet were.

Now I get to see just how tiny they were everyday. I made her a footprint shadowbox for her room, which has been sorely lacking in decoration. I started by cutting out the butterflies using the Silhouette (oh, how I love thee) and then printed her monogram, birth date, and footprints onto card stock. It took a little calculating to figure out how everything was going to fit and then I glued it all together.

I have to be honest, I LOVE the final product. It is such a sweet reminder of one of the best days of my life.
Family Ancestry Cabinet
My Grandmother had all of these awesome old pics, but she had no idea WHO they were except that they were my ancestors. I didn't want them to end up in the trash. I knew that I wanted to use them and preserve them in some way. Then I was out at a garage sale and found my already repurposed cabinet. They man at the sale kept telling me he made it. I thought he was crazy until I realized that it used to be an old TV console with the tv removed and shortened. He was so proud of it, I don't think he really wanted to sale it. It had a lip on the top of it so I knew that it would be perfect for what I had planned.

I removed all the insides, and replaced the speakers with a wood panel.
I then painted the entire cabinet black.
I gathered all the pictures and began putting them into place.

After all the pictured were glued down and in place
I poured a box of epoxy super glaze over
the top to protect and seal all of my pictures.
I will now have a one of a kind family heirloom
covered with my ancestors preserving thier memory.
It is so cool to look at all of them and
think that they are my relation some how.

Modge Podge Picture Canvas
When I first heard that the first round was "preserving a memory" the first thing that came to my mind was
MODGE PODGE!
{LOVE that stuff!}
So I threw a few ideas around and finally came up with something that turned out really great in the end.
Also could be a wonderful mother's day gift!

The supplies I used: a stretched canvas {16x20}, a photograph, yarn & fabric scraps {both to make a pennant banner}, modge podge, brush, scissors, torn up book pages, sharpie, some font that I liked and printed it out.
First I tore up all the book pages and modge podged them to the canvas.
{Put another layer of modge podge over it after it dries}
then I modge podged the picture,
then the letters
{There were a little bit of white spots from the print out of the cut out letters so I filled them in with a sharpie}
I thought it needed a little color so I thought that I would add the pennant banner... good decision!!! :-D

I really LOVE how it turned out.
Great memory to keep forever.
It was sooo simple and not even that time consuming!
Both things I love!

Memory Box
I'm so excited about this craft. When I first read what the competition was going to be, I thought "Oh no I can't do this" but after calming down and doing some serious thinking, I thought of making a memory box. My first thought was to make it from wood and build my own box, Then I saw this empty box that I hadn't thrown out yet and it looked perfect for what I had in mind.

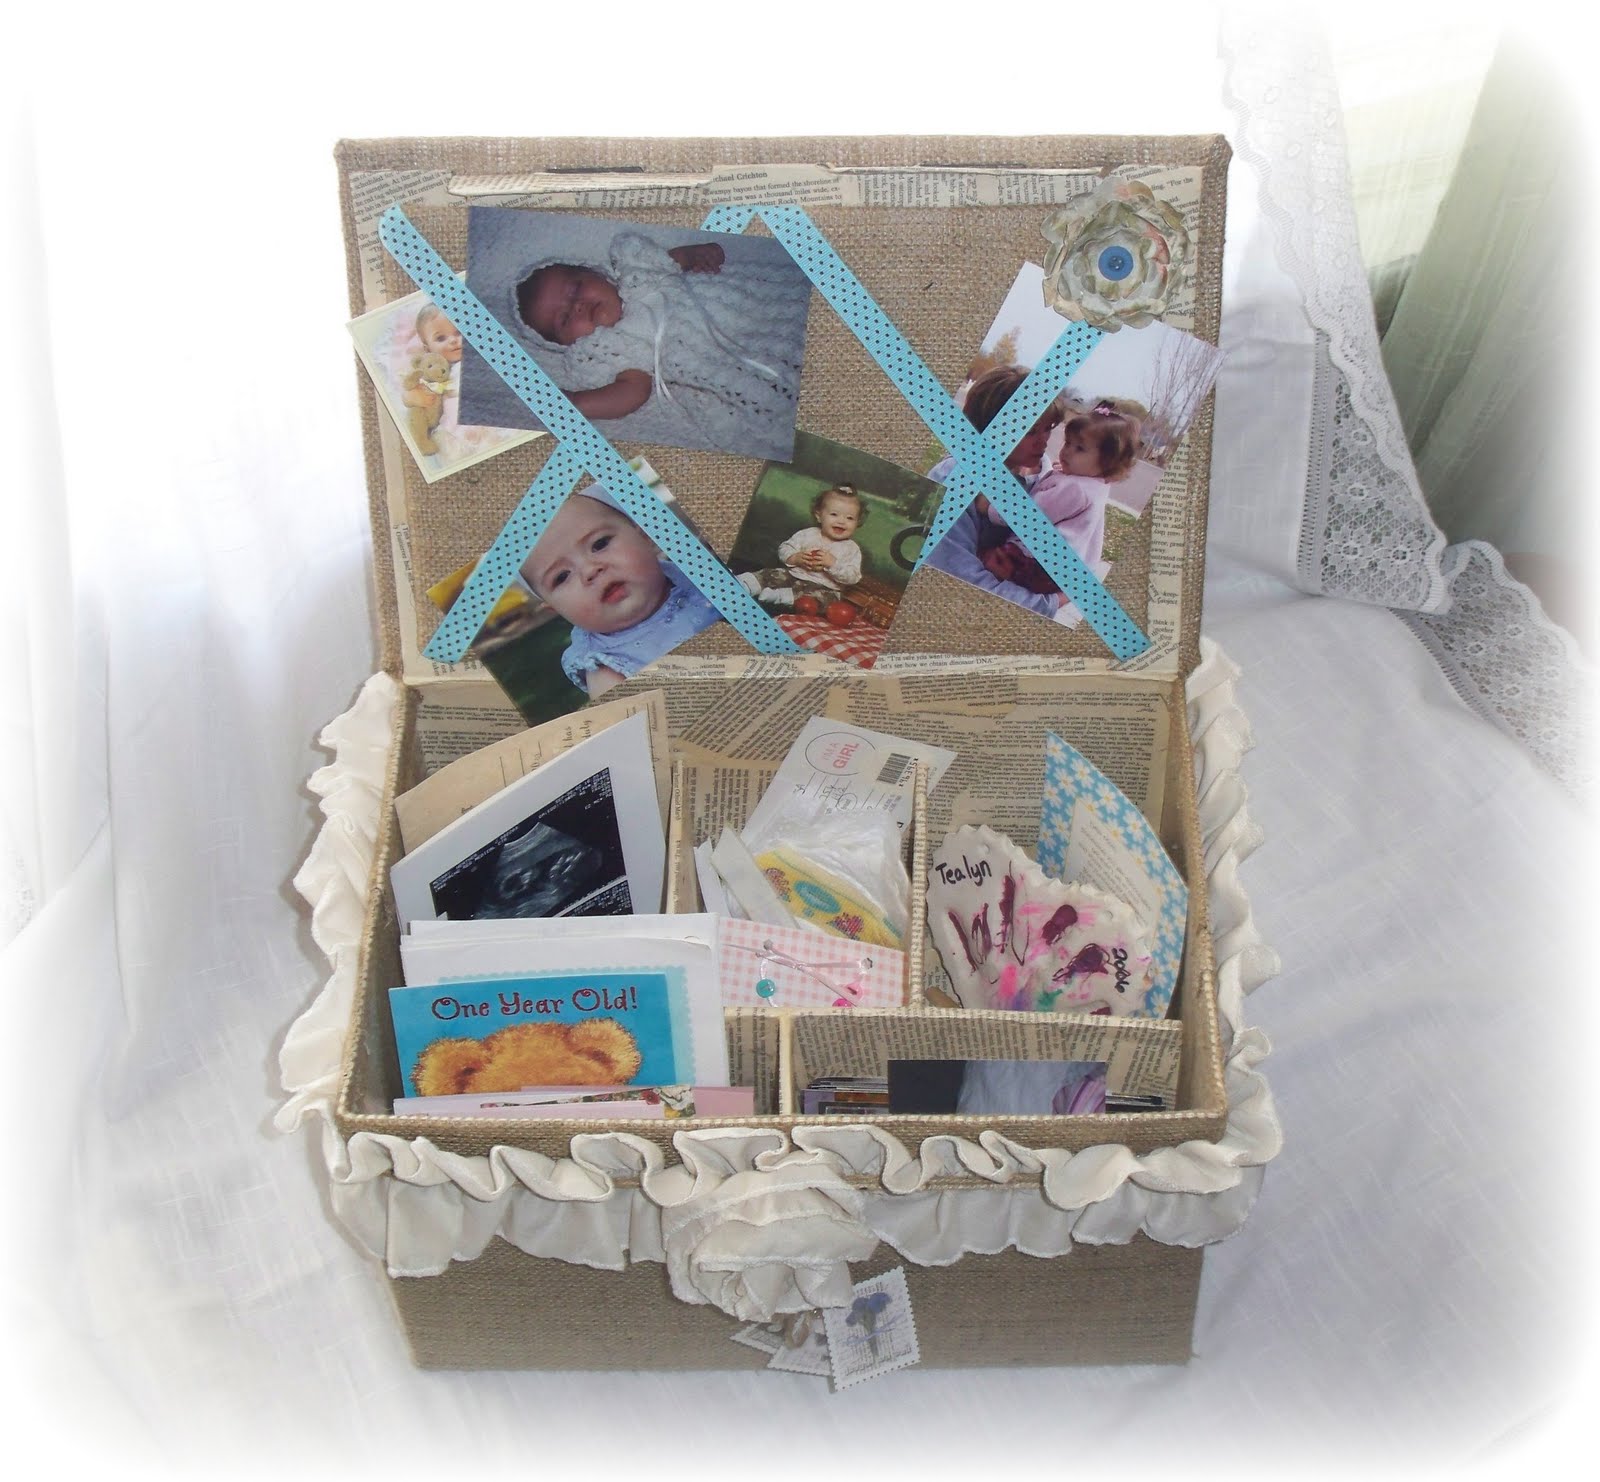
So I got out some supplies (Modge Podge, glue gun, tape, burlap, a foam board,batting, ribbon,an old book, and some fabric) and got started. The Box had two flaps that went over the top so I cut off one and the two side flaps. I saved the big front flap and used it to make the memory board. I cut a piece of foam board just bigger than the top piece for the lid, and pieces for the dividers for the inside. Then I got busy and Modge Podged torn and full book pages all over the inside of the box and the dividers that I made. I glued burlap to the outside pieces. Then sewed a long piece twice the width around of the box surging the edges and making a ruffle from it. Glued the ruffle to the box, and made a flower from the ruffle for the front. Then wrapped the foam board piece that was cut just larger than the box flap with burlap and glued it in place on top of the box.

For the Mini Memory Board, I wrapped the cardboard piece I had saved with batting and glued it to the back side, Then repeated that step with burlap. Arranged the ribbon how I liked and glued it to the back. Oh and the little flower on it was just made from scrapbook paper and a button. Then glued it to the front flap of the box. I had everything on hand to make this, I didn't have to go buy anything for it that is the best part. I'm so happy with how it turned out.

Cupcakes on the Beach Quilt

One of our favorite memories from last summer was eating cupcakes on the beach. We would go to Sprinkles with our friends, whisper the secret word of the day, and get our free cupcakes! Big, luscious, melt-in-your-mouth cupcakes! We headed to a little beach nearby and enjoyed them in the sunshine. Sometimes, we would see dolphins, so magical!! Friends and cupcakes at the beach, it doesn't get any better than that!!

I love the row of appliqued pink cupcakes on the back of the quilt!

My kids loved watching me make this quilt..
As each piece was added, they would get so excited!!
We can't wait to go to the beach again this summer!!
Wow, girls!! You all are some kind of crafty!! Good luck.
ReplyDeletewhat a great round!!
ReplyDeleteGreat Job, so creative!
ReplyDeleteThis is an amazing round!! I can't believe I have to judge such awesome projects!! Amazing ladies!! :)
ReplyDeleteI love so many of these projects! Wish I could vote for all of them! Great job!
ReplyDeleteI had a hard time picking my favorite!
ReplyDeleteOh my gosh! these projects are amazing! So hard to choose!
ReplyDeleteThis was the most difficult time I have ever had voting, everything is absolutely amazing!!!!!! I want tutorials for it all. Yes, my home will soon be decorated in items that were inspired here.
ReplyDeleteThere are some really great ideas this week!!
ReplyDeleteWow! What a talented group of ladies! I had a hard time this week choosing. Good luck!
ReplyDeleteLove it all!! Great Job!
ReplyDeleteLoved them all and had a hard time picking just one.
ReplyDeleteAmazing talent! All are great in their own special way.
ReplyDeleteAttractive section of content. I just stumbled upon your site and in accession capital to assert
ReplyDeletethat I get actually enjoyed account your blog posts.
Any way I will be subscribing to your augment and even I achievement
you access consistently rapidly.
Also visit my weblog :: cash advance florida