
This week's challenge is frames. Contestants were asked to use a frame in their project. Vote for your fave at the bottom!
Picture This Pillows

For the frame challenge I thought what would be more fun a summer frame project, then some Picture This! Pillows.

Each pillow is made out of a heavy muslin and decorated to suit the color of each frame. The frames are lined with clear vinyl, to help protect your picture from tiny hand and finger prints.
The bigger pillows are actually pillow covers, so your pillows can be switched out to suit summer decorations or certain colors of different rooms.

The best part about the Picture This! Pillows is that swapping out pictures is as easy as 1-2-3!!
Pallet Wood Frame


I have to admit, this week's challenge threw me for a loop. I mean a frame is a frame, right? But, I'm trying to use this competition as a way to help me be more creative and original, so I gave it a lot of thought and came up with something really neat (I hope).

I loved the idea of using pallet wood, and since I had some on hand I got right to work making the frame itself. It consists of 4 boards, 2 of which I cut in half. Each side has 1 1/2 planks, and the top and bottom use the other 2 halves. It ended up working out perfectly to create a floor length leaning style piece (this would make a totally awesome mirror!). I used flat brackets (also called menders) and wood glue to connect the boards together.
Keeping with the rustic nature of the frame, I only sanded lightly to remove splinters but left the wood as is otherwise. Twelve screw-in eye hooks create the twine grid, and clothes pins hold some vintage-y images from Graphics Fairy in place. In my home, it serves as a decorative piece- but it could also sport inspiration images from magazines, fabric swatches, or paint samples. How sweet would it look in a home office?

Oh and the best part for a cheapskate like me: the total cost was about $7 since I had everything on hand except the brackets and the eye hooks. I hope you enjoy it as much as I do!
Frame Tea Trays


 1. I purchased tea cup hooks and picture frame eyelet thing-ys (don't know the real name) and secured them into the frame. These hold my earrings and necklaces.


Monogrammed Wall Art

I have been looking for a nice little tray for serving tea, coffee, etc. and haven't found anything to my 'liking' so I created three using frames and some porcelain knobs from my local thrift store. The two smaller frames to make a 'set' for holding spoons, cream, sugar, etc. I began by taking them all apart and removing the glass. I primed and then painted them in this pretty pink color to match the decorative papers I planned to insert. (It should be noted that for some unknown reason to me, the paint 'crackled' in parts. I was going to sand and repaint but I actually thought it added to the 'aged' look of these!) Once they were painted, I distressed them a little with sandpaper.

For the main tray I added this fun quote about tea and the vintage tea service image from The Graphics Fairy that says, "The mere chink of cups and saucers brings the mind to happy repose" (Isn't that fabulous?!) and inserted the papers into the frames. The knobs for the 'feet' were attached also using E6000 glue. The handles are old spoons I had (also attached with E6000. . . can you tell I LOVE this glue??). To add to the vintage charm of these, I added some 'bling' (a.k.a. old jewelry) Hmm. . . Let's see if you can guess how I adhered the bling??. And now I'm looking forward to serving up tea and treats on these little beauties!

Family Treasure Frame
Space in my house is limited, so often times decor has to do double duty..it has be be beautiful and functional. Today's challenge is no exception. FRAMES. I call my creation...
"Family Treasure Frame" because it frames pictures of my children (treasured gems) and also frames my go-to jewelry. 
What makes this frame really special is it was originally a printer tray/display shelf that I've had since I was a child. It use to hold lots of my knick-knacks and because I am not a knick-knack type of gal anymore, I had no real purpose for it. Until today...now I can see past it's obvious purpose and make into something unique and functional!!!

How I did it...
 1. I purchased tea cup hooks and picture frame eyelet thing-ys (don't know the real name) and secured them into the frame. These hold my earrings and necklaces.
 2. I cut my paper to size for the back of the small holes. I chose not to cover the entire background because it is beautiful "as is." I spelled out family in the top holes.
3. To hang my flower pins I glued a magnet in the center.
4. For the pictures I wanted them to really stand out and nothing ever to be placed in front of them. I made a box to insert in the hole. Now the pictures are flush with the frame.
I absolutely love this frame and it's multi-purpose use!!! Thank you so much for your votes last week so I could find the motivation to complete this project!
Child-Sized Tea Tray
I used a standard 4x6 picture frame, removed the glass, painted the frame, added handles, and inserted a fabric covered piece of cardboard with a strip of lace.
Easy peasy.
Aaaand Super cute too.
I toyed with the idea of somehow protecting the fabric from spills, but decided it would be great to be able to change the fabric from time to time (and be able to wash if need be). Although I think these guys will be pretty neat about their tea parties.
Tea anyone??
Dry Erase Message Center

I had a few different ideas for our frame themed week. I am so happy with the project I finally chose to make. I am lucky enough to have an entire room committed to my work space. Unfortunately most of the walls in that room are covered with mismatched art and reminders held up by push pins. I have a very busy schedule and really needed one place to see everything together. This week was a perfect opportunity to finally organize all my scattered post it notes and messy calendars. I turned four old frames into a wonderful organizational dry erase and cork board. 

I added turquoise and yellow embellishments and made some cute matching push pins to use on the cork board. All the glass pieces will be used as dry erase boards. I love that I can easily write and erase my daily to do and shopping lists. The calendar will be a great visual reminder of the activities for the month and is much better than my previous 35 post it notes stuck to the wall.

The display is quite large (28" x 38") and covers the entire wall space directly above my computer desk.
Thanks to OMTWI I am smiling each time I sit down at my desk and look up to see the pretty splash of yellow and turquoise on the wall! 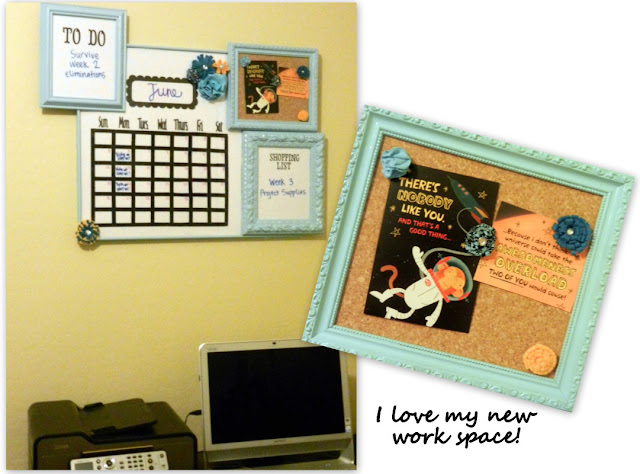

The cork board will eventually be a place for pictures but for now, I'm loving the card my husband recently gave me!
Vintage Sewing Machine Art

Frames are one of my favorite ways to decorate. Currently I'm working on my craft room and decided to make a little art for the wall. I used some of my favorite fabric to create a framed silhouette. I love the look of vintage sewing machines and thought an applique would be perfect.

I painted the frame blue and then white. Then sanded the edges so the blue would show through in some place. Its has a great distressed look. I also added some hand embroidery to give it a little more detail. Perfect for any crafter.

Monogrammed Wall Art
Here we are at week 2 {SQUEAL} I am pretty excited about this project!
 |
For the frame theme I found three frames at a yard sale for (get this) $1.25 I was pretty excited. Then I just painted the frames and modge podged some wrapping paper to the big frame backing board. It is pretty big 31X37 so I didn't want to piece a bunch of scrapbook paper together. Besides I love that wrapping paper! Then I just glued the frames together and added the V that's the first letter of our last name.  I also added the vinyl word family. I kind of wiggled the wrapping paper to get it to wrinkle and give some texture to the background and I just adore how it looks. |
 |
| I can't get enough of the textures in this piece. I really am loving the whole project! Thanks so much for the inspiration and letting me share it with you guys! |
Frame Savings Bank
The frame theme this week really excited me -
because I’ve had this particular projecrt on my to do list for a loooooong time.


because I’ve had this particular projecrt on my to do list for a loooooong time.

What is it? What is it??? You don’t
know??? Just kidding. It doesn’t look like much right now, but envision it
like this:
know??? Just kidding. It doesn’t look like much right now, but envision it
like this:

Only with a lot more money in it. Just
kidding. With my frame, I wanted to create a fun and personalized bank for my
son. I got a large thrift store frame for 2 dollars and painted it black. I had
to use several power tools, a razor blade, balsa wood, mod podge, and houndstooth
scrapbook paper in order to turn it into a viable money-saving machine.
I sectioned off three separate areas for my son’s
different “funds” with balsa wood partitions. Then I used vinyl to label them
- tithing, mission and savings. I’m excited for the opportunity this gives my
husband and I to teach him valuable lessons about budgeting and saving his money.
different “funds” with balsa wood partitions. Then I used vinyl to label them
- tithing, mission and savings. I’m excited for the opportunity this gives my
husband and I to teach him valuable lessons about budgeting and saving his money.

What I like best is that you can personalize this
for anyone! Saving money for school? A wedding? A big family
vacation? Just label the section on the glass appropriately! You can even
peel off the vinyl and change the labels if they are no longer applicable!
for anyone! Saving money for school? A wedding? A big family
vacation? Just label the section on the glass appropriately! You can even
peel off the vinyl and change the labels if they are no longer applicable!
Not only that, but it hangs on the wall, front and
center as a constant reminder of the importance of saving our money for certain
things. And it looks cute and stylish, too! It’s a bank that doubles as
artwork!
center as a constant reminder of the importance of saving our money for certain
things. And it looks cute and stylish, too! It’s a bank that doubles as
artwork!
NOW VOTE FOR YOUR FAVE PROJECT!!
I love the pallet wood frame! A brilliant upcycle! Need one of those for my craft room for sure.
ReplyDeleteIm sad to have been voted off, but everybody is so talented. Great job girls!
ReplyDeleteso creative and pretty and something that we can all use! love this one!!
ReplyDeleteThis was seriously too hard to choose! I can't wait for them to be revealed, I've added more than a few to my 'want to do' list!
ReplyDeleteThe frame savings bank idea is genius. Love it.
ReplyDeleteSome really creative ideas here! My little wheels are turning. =)
ReplyDeleteGood reading thiis post
ReplyDelete