What a great way to kick off the new year! We’ve got 12 new contestants and they have come up with some fabulous projects for this first round. The theme for the week is The Graphics Fairy. Voting is at the end of the post….we will have a hard time choosing!
Number 1: Three Projects
First of all - I still can't believe that I am in this competition with such talented women! I'm so excited and so nervous. Well, here we go...Our first challenge required us to use images from The Graphics Fairy. Yay! I love this site! I spent a few hours looking through the images but couldn't decide on just one. :-) Yes, that's right, I did three projects - 1. Wine bottle dish soap dispenser. 2. Hand towel with transferred image. 3. Framed architectural image. I wanted to dress up my kitchen counter-
I started with the wine bottle. I washed out an empty bottle and removed the label. I filled it with dish soap, replaced the cork and dipped the top into a melted candle a few times. I printed out an old dictionary page and a vintage cold cream label from The Graphics Fairy. Next, I glued the cutout label onto a strip of the dictionary page. After I glued it onto the bottle, I pierced the cork to allow the soap to pour-
For my second project, I added an image to a hand towel. I fell in love with this old Paris letter with postmark. I wanted to use supplies that I already owned to keep the costs down. So I made my own transfer paper. I attached a piece of freezer paper to a piece of copier paper using spray adhesive (making sure the wax side is faces out). Then I printed out the image on my home copier (using the mirror image setting). I placed the image onto the slightly damp towel and burnished the image with the back of a spoon. And that was it. Super easy.
And my last project just involved a frame I found on clearance and a printout of an old gate. I love architectural elements - so framing the gate image was an easy way to finish this little vignette.
I love this mini-kitchen makeover. It really adds a finished touch to the room. Thanks Graphics Fairy!!
Number 2: Vintage Chalkboard
Hello everyone! I'm so excited to be part of this competition! Yay! I had a hard time deciding on which image to use from The Graphics Fairy{she has GREAT stuff!}, and what exactly I wanted to do with the image...believe me people, this kept me up at night and when I did sleep, I even dreamed about this first week! I finally decided to use the beautiful vintage postcards from all over the world.
I started with a chalkboard that I had made. It was originally yellow and I messed up one end and put the molding upside down. Yeah, I really did. Then I spray painted it white and smothered it in silver glitter blast. I thought covering it with vintage postcards would cover my mistake and look pretty awesome!After applying the postcards with Modge Podge, I distressed it with a Martha Stewart metallic glaze.
A close up of the details. I made sure to crease the paper in all the grooves of the molding and topped it off with some jute to give it a finished, vintage look.
This chalkboard would be awesome in a little boy's vintage travel/map theme bedroom. I just love the look of the vintage postcards! I would be so grateful if you voted for my project! Good luck to all the girls :)
Number 3: Scripture Cover
Hello everyone. I'm happy to be here at One Month to Win it. I was excited to use images from the Graphics Fairy in a new way. My oldest daughter was baptized in July and I have been meaning to make her a scripture cover ever since. Thanks to this competition I finally got around to it. I used a cute crown image on the front because my girls are my princesses. I hope you enjoy it!!
Number 4: Daily Organizing Center
For the Graphics Fairy challenge I made a daily organizing center. I took an old shelf that I got at Goodwill & painted it with chalk paint. I then "beat it up" a bit & attached some of her wonderful images to it.
I used images of old postage & various birds. I like the colors of the birds & the feeling of flight. Maybe my mail will arrive to it's destination faster ;).
Besides having "in & out" baskets for the mail I also made number blocks for keeping the date & a space for writing & leaving notes. This shelf can be mounted on the wall or simply placed on a countertop anywhere.
Number 5: Une Petit Pouffe
For the first week's project, one of the most difficult parts was deciding which of the fabulous graphics from The Graphics Fairy to use. After much browsing and selecting many options, I decided on this pretty vintage French sign. I knew I wanted to try to use the graphic in a unique way, so this little floor cushion, or "Une Petite Pouffe" was the final product!
I started by printing the graphic directly onto linen fabric using full-size adhesive sheets to feed it through my printer. I then surrounded the graphic with a band of gathered houndstooth and some decorative trim. I made this for a little girl's room, so for a bit of fun I added ball fringe on the outside edge. Black swirls adorn the body of the cushion, which unzips to remove the stuffing if it needs laundering.
I think it makes a perfect perch for reading a good book, and I believe my little model agrees!
Number 6: Vintage Floral Statement Necklace
When I checked out all of the gorgeous vintage graphics The Graphics Fairy has to offer, I knew I had to create a piece of jewelry. (The images are so beautiful I wanted to wear them!) I remembered those Shrinky Dink charm bracelets people used to make and was thrilled to discover that there is now printable Shrinky Dink. I had to try it. However, I hate wearing bracelets... so I made a bold statement necklace instead. I love how it turned out!
First, I chose the images I wanted to use--Stunning French Fan & Postcard with Floral Spray. I cropped/resized the images on my computer, then printed them on a sheet of Shrinky Dink according to package directions. Then, I cut my floral shapes out and punched holes so I could add jump rings later.
Next, I baked my pieces (once again, following package directions). I put them in the oven one at a time, so I could monitor their progress individually. Once they were done shrinking, I pulled them out, covered them with a sheet of parchment, and placed a heavy book on top for a few seconds so they would be nice and flat. Finally, I added my findings, a chain, and a satin bow just for an extra dose of femininity... as if a necklace of roses isn't girly enough. :)
Now I get to wear these beautiful blooms around my neck. This lovely necklace turned out so well, I can't wait to make a few more!
Number 7: Keep Calm and Carry Yarn Tote
WOW! I am so excited to be apart of this season’s OMTWI! It is such an honor already : ) So this week’s challenge we had to incorporate an image from The Graphics Fairy, such an amazing blog! I spent hours on there figuring out what I wanted to do… there were so many options! I chose the fabulous yarn ball graphic and made a Keep Calm and Carry Yarn Tote.
How often are you knitting or crocheting and all your yarn gets tangled up? This isn’t just any ole tote bag..it has a few awesome perks!
1. It is just adorable isn’t it? Durable, stands on it’s own, and big enough for all you need!
2. You pull the yarn out through the side, eliminating your need to untangle when changing colors. Easy to use no matter where you are – in the car, at home, in the doctor’s office, ANYWHERE!
3. A pocket in the back to carry any patterns you are working on or a notepad if you are making your own!
4. Store all your hooks/needles right in the side so you never loose them!
Let’s take a closer look!
The first picture shows you the graphic I used. This was done printing onto fabric and then I sewed it on to the front of the tote. The last picture is of the inside of the bag. You stack your yarn right on top of each other never needing to move it around… just pull through the sides!
This tote makes me happy and I already love using it! There will be a tutorial after the results ; )
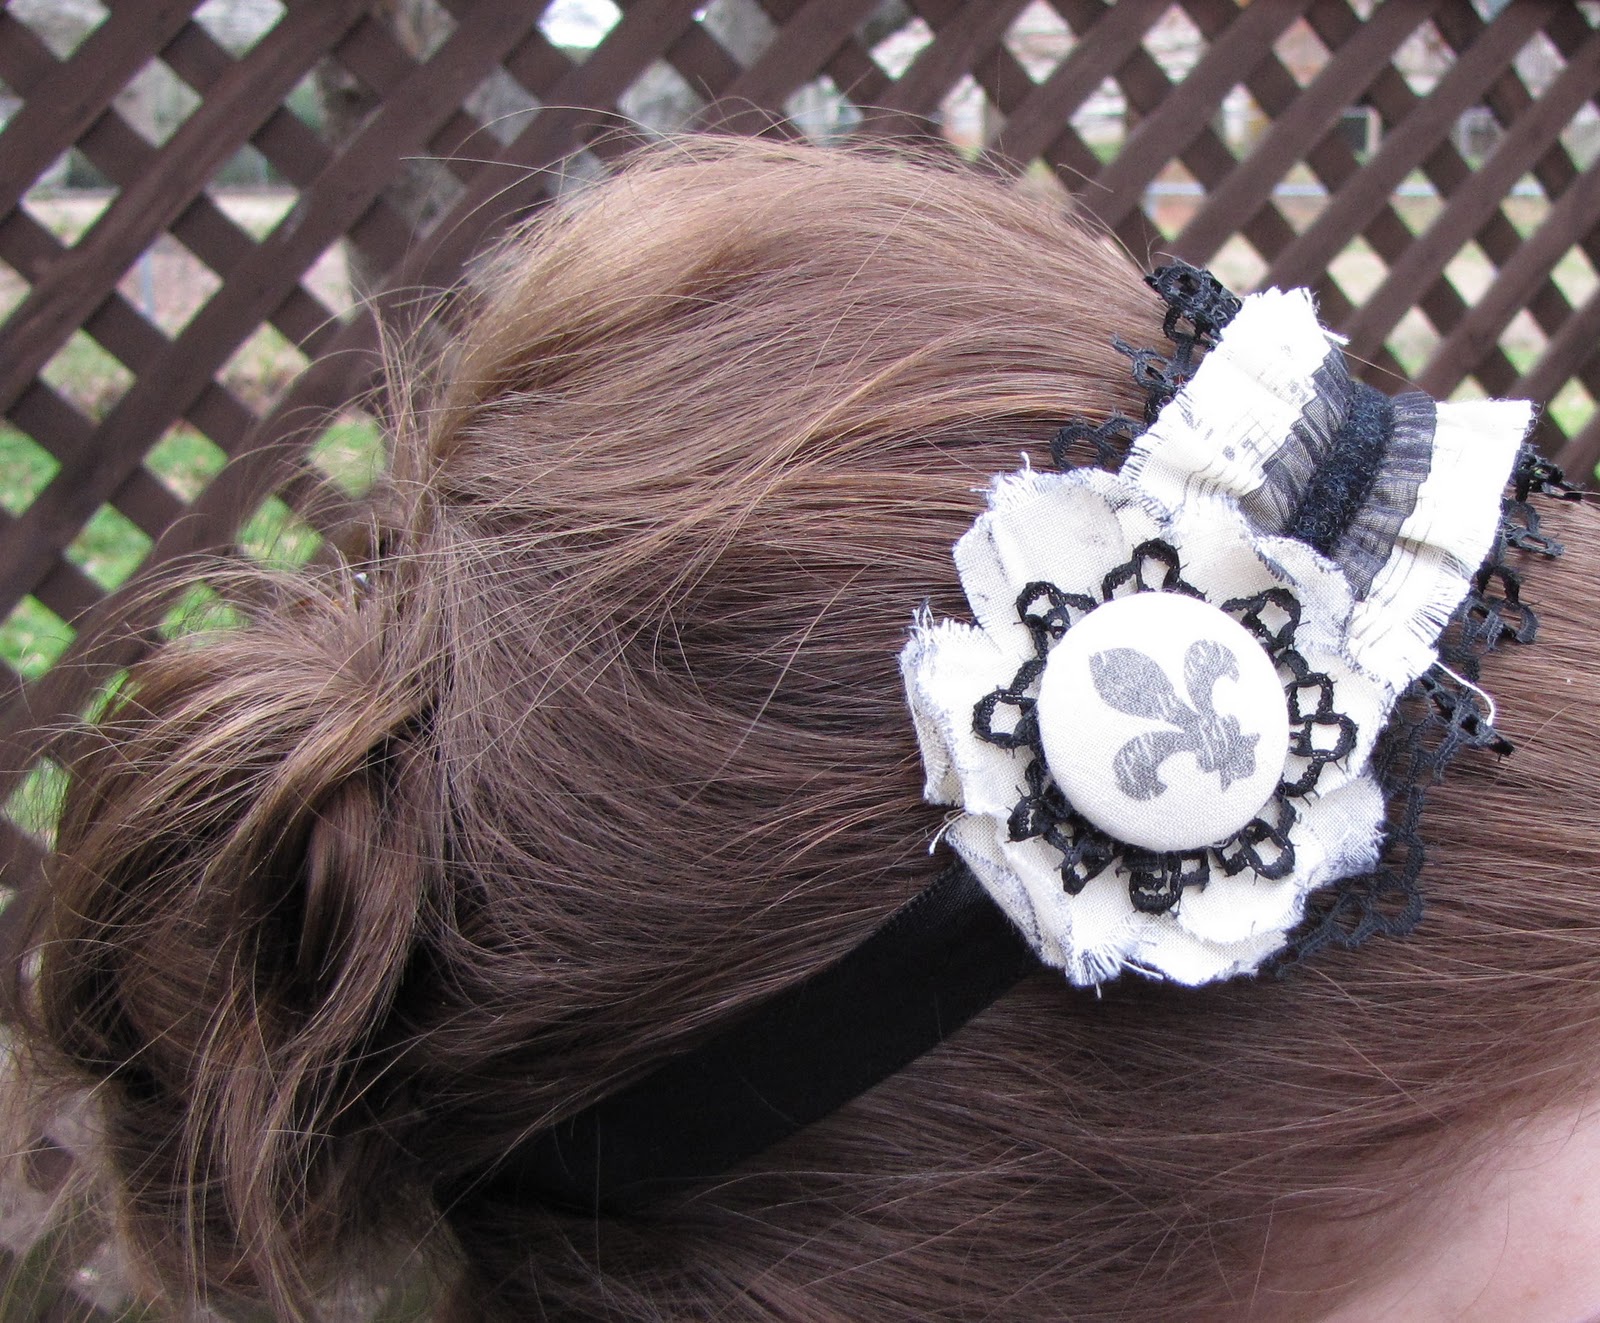
Number 8: Shabby French Ruffle Cuff/Headband
I was so excited about this week's theme, cause let me tell ya, I love me some Graphics Fairy! The biggest challenge was narrowing down which graphics to use.
I settled on some sheet music and a fleur-de-lis and got to work on my Shabby French Ruffle Cuff!
First, I printed the graphics directly onto fabric using the freezer paper technique here. Then I cut a strip of sheet music from the fabric and ruffled it up with my trusty sewing machine and added some lace & trim. To make the flower embellishment, I used the fleur-de-lis to cover a button and hot glued a bit of lace to the back. I cut out a couple flowers and inked the edges, then stacked it all up and stitched it to the cuff. I then added a length of black satin ribbon to each end and covered the back with a bit of black felt to finish it up! All done! :)
BUT WAIT! You didn't think that was all, did ya? This Shabby French Ruffle Cuff lives a secret double life as a Shabby French Ruffle HEADBAND! Just tie it around your head and you've got an accessory that pulls her own weight!
So there you have it! A Shabby French Ruffle Cuff/Headband!
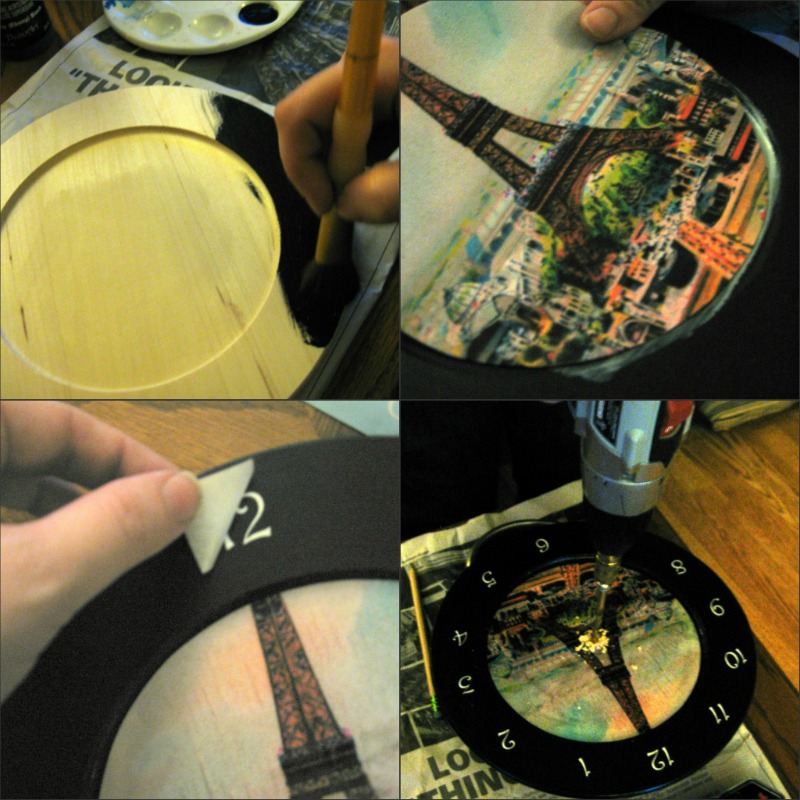
Number 9: Parisian Plate Clock
I'm going to be honest, the first week of competition sort of snuck up on me. I had a completely different project planned, but due to the Christmas craziness and a bout of illness that seems to be plaguing my house that limited my crafting time, I had to come up with a different project for the first week of competition. So off to Michael's I went, coupons in hand, and wandered the aisles looking for inspiration. I was in the unfinished wood aisle when I noticed that their wood plates were on clearance. Hanging right above them were all the parts to make your own clock. I remembered a beautiful Eiffel Tower graphic that had been on Graphic Fairy just the day before and it all came together in my head.
I painted my wooden plate and when it was dry, I took my vintage Eiffel Tower graphic that I had printed out and cut down to fit inside the inner circle of the plate and mod podged it down. I applied vinyl numbers around the outer edge of the plate and applied a layer of polyurethane over the entire plate, so that the graphic wouldn't smear. When the polyurethane was dry, I drilled a hole in the center of my plate and put the clock arms together.
It's a shame I wasn't able to use more of the pretty graphic on my project, but I'm so pleased with how well it turned out. I will be definitely attempting a similar project in the future!
When I saw the first challenge for OMTWI was to use a graphic from the Graphics Fairy, I immediately thought “Awesome! She has so many great images, this should be easy!”
The problem is… Karen has so many great images that this challenge was, well, a challenge!
I found my inspiration in the cherubic faces of her printable vintage paper dolls. But rather than use paper, which can tear all too easy in the hands of two rambunctious children, I decided to use fabric!
I fused freezer paper to some cotton twill fabric to create a sturdy, printable surface, then printed the images directly onto the fabric with my inkjet printer.
After bonding the printed fabric to felt, I sewed around the doll and clothing pieces before cutting. I then added some stiffened felt (available at craft stores) to the dolls for more stability.
I’ll be sharing the full tutorial on my blog once voting is closed... I’ve got more pictures and instructions and for those of you who don’t sew, you’ll be happy to hear that there is a no-sewing required option as well. ;)
I adore the vintage images of these sweet, rosy-cheeked, wide-eyed little girls and hope you’re inspired to make your very own Fabric Paper Dolls (whether for you or for that special little person).
It would be such an honor to have you vote for me – I would love to stick around and share some more fun ideas with you!
Best of luck to everyone!
Number 11: Lockers with a Graphic Punch
Let me just say I LOVE the Graphics Fairy. When I saw the first challenge was to use one of her amazing graphics, I was thrilled. My biggest problem was narrowing down all of the options! But since I have been obsessing about using arrows in design lately, I decided to find a great arrow graphic and pair it with a yard sale find from my stash in the basement.
I picked up these dirty, beige lockers this past summer at a yard sale for five bucks. I love the industrial, vintage vibe lockers can give a space, but these guys were pretty blah to begin with. They didn't even have numbers! I knew the right graphic could really add some major style. I found the perfect arrow on an old weathervane graphic.
Of course, I had to make the arrow huge to work on these lockers. I unrolled a loooong section of contact paper the same height as the lockers and drew my arrow design onto it free-hand. I then used an exacto knife to cut out the design. After spray-painting the lockers white, I stuck my contact paper stencil on the front and stenciled on the arrow design with some pretty turquoise paint.
Now it has the perfect graphic punch. Just right for a kids room, fun family room, or of course a craft room.
Number 12: Lingerie Chest Transformation
This lingerie chest has been passed all around the family, and finally, put to use in my mom's L-L bathroom. The drawers are great for storage, except for taller cleaning supplies. : /
When I saw someone else's recent transformation of a similar chest,
I knew instantly that--
I had a new project!
Gut it. But leave a drawer for toilet paper!
Re-fit the interior walls.
Make a door. But, if I make 1 door--does it swing left to use at the sink, or to the right for the toilet? I split the difference--smaller doors will work both ways and take the least amount of space!
Paint, transfer image, wax, and faux marble the top.
Oh wow, these were awesome I wish I could have picked one more but made my choice and now I'm going to go get a cup of coffee and relax, can't wait till next week. Ladies you all did fantastic, btw!!!!
Great question about the picture sizes! The contestants are given a size limit and they send us the images in the size they want to use. It is up to each contestant to determine what size their own images are.
You ladies are my new sheroes! Go, Go, Go...and the best part is that I can recreate all of them in my studio...you have done the hard work! Thanks for the great inspiration.
I love these projects and all of the fun graphics. Thanks for the introduction to The Graphics Fairy and to the contestants for all of their creative energy. I look forward to more from each of you.
great creative people out there...so glad you share...very inspiring...freezer paper printing on fabric new to me...can`t wait to try it!good luck to all.


 This lingerie chest has been passed all around the family, and finally, put to use in my mom's L-L bathroom. The drawers are great for storage, except for taller cleaning supplies. : /

voted for my fav!!! Had to go with a simple, but beautiful makeover!! ;)
ReplyDeletewow-- great work! It was difficult to choose my favorite! Good luck!!
ReplyDeleteI don't see No. 11 on the voting poll. Did you forget to add this one?
ReplyDeleteOh wow, these were awesome I wish I could have picked one more but made my choice and now I'm going to go get a cup of coffee and relax, can't wait till next week. Ladies you all did fantastic, btw!!!!
ReplyDeleteOh my gosh those are all awesome ideas!! I have to say I am pretty excited about that shrinky stuff being available to use in your printer ❤
ReplyDeleteThank you all so much for your comments and votes. We fixed the poll and all of the entries are now showing.
ReplyDeleteThis is such a wonderful first week! I always love seeing the cleverness of these contestants! Lisa~
Lovely entries. It was truly hard to pick a favorite.
ReplyDeleteThese are all beautiful, I had a hard time choosing! Good job!
ReplyDeleteall of them are sooo darling - it is a HARD choice to make! you judges have a tough job ahead!
ReplyDeleteAll the projects are lovely and seem to be well thought out but may I ask why are some photos huge and some tiny?
ReplyDeleteGreat question about the picture sizes! The contestants are given a size limit and they send us the images in the size they want to use. It is up to each contestant to determine what size their own images are.
ReplyDeleteThanks for asking! Lisa~
Wow, I'm blown away!!! So much talent here in one place!! I wish I could vote 12 times!!!
ReplyDeleteawesome. amazing talent.
ReplyDeleteWonderful entries :D I've already chosen my favourite :)
ReplyDeleteVery fun challenge. Love the furniture! Everything!!!
ReplyDeleteLots of great fun projects!
ReplyDeleteThanks for sharing! :)
Love that chalk board!
ReplyDeleteLoved several items: the mail center, the lingerie chest, and the vintage chalkboard were my favorites.
ReplyDeleteall were just fabulous! so hard to vote on just one.
ReplyDeleteYou ladies are my new sheroes! Go, Go, Go...and the best part is that I can recreate all of them in my studio...you have done the hard work! Thanks for the great inspiration.
ReplyDeleteAWW its so hard like choosing between your kids!:))They are all winners:))
ReplyDeleteLoved the rose necklace, the redone lockers, the clock and the lingerie renovation! Hard to vote for just one. Good luck to all! Great talent and fun!
ReplyDeleteI love these projects and all of the fun graphics. Thanks for the introduction to The Graphics Fairy and to the contestants for all of their creative energy. I look forward to more from each of you.
ReplyDeletegreat creative people out there...so glad you share...very inspiring...freezer paper printing on fabric new to me...can`t wait to try it!good luck to all.
ReplyDeleteHow inspiring! I can't wait to try out some of these ideas.
ReplyDeleteWow! I'm inspired to do something! Anything! :)
ReplyDeleteEveryone is So Creative! Hard to choose 1 favorite!
ReplyDeleteI would adore having that lingerie chest in my home. Definite my choice.
ReplyDeleteThese are all so inspiring!! I NEED to try making some of these!! Great job everyone!
ReplyDeleteAll the projects are beautiful! I need to start creating from my piles of "To Do's." Such creative minds at work...Thanks for the inspiration ladies!
ReplyDeletelove them all, but this is so me:) well done to all.
ReplyDeletemy personal favorite is the Keep Calm & Carry Tote!! SO CUTE!!
ReplyDeletei missed the cut off, is there any way i can still vote?
ReplyDeleteboo I missed voting...but love the lockers :)
ReplyDeletewow..such talent you have. Do you have a tutorial on how to make the Une Petit Pouffe? It's gorgeous
ReplyDeleteTrish