
Time to vote for you favorite week 4 project! Yep it is the finale!! The theme this week is Power Hour. Contestants were asked to create something that could be completed in one hour start to finish!
Scroll down through the projects and vote using the poll at the bottom! :) All projects are anonymous. Poll will be open through Wednesday at 11:59 pm Central time. Come back Friday to see the winners revealed! And follow along with OMTWI so you don't miss the rest of the competition this month! :)
Scroll down through the projects and vote using the poll at the bottom! :) All projects are anonymous. Poll will be open through Wednesday at 11:59 pm Central time. Come back Friday to see the winners revealed! And follow along with OMTWI so you don't miss the rest of the competition this month! :)

A wonderful last week! And next week we start Season 2 with a whole new set of contestants!! Only a few weeks until auditions for Season 3 open up -- are you ready to make the cut??
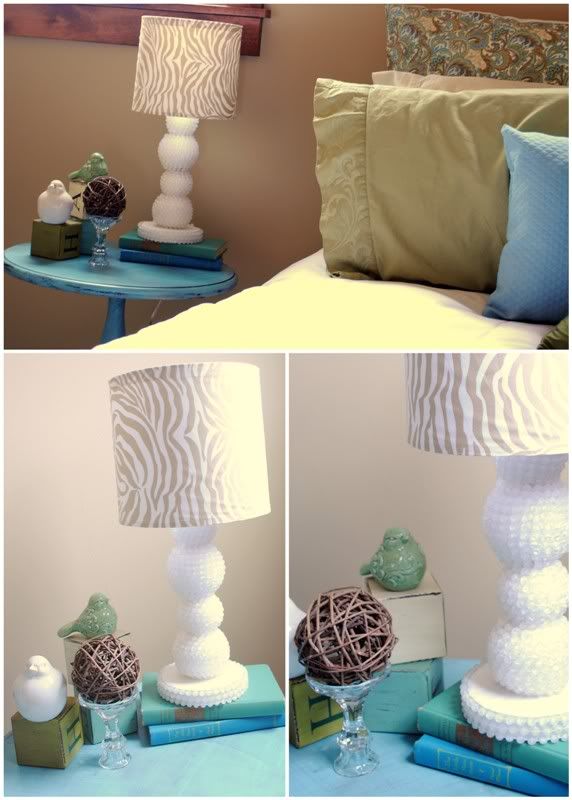
Project #1 -- Beaded Lamp
I can't believe the final week of OMTWI is already here. Since the contest started I have been trying to figure out a great "Power Hour" project. Most of my ideas required extra time for paint to dry or would be frantically rushed to get done in one hour.
I finally decided to go with an idea that I knew I would not only finish in an hour, but it would be a project that would be functional as well.
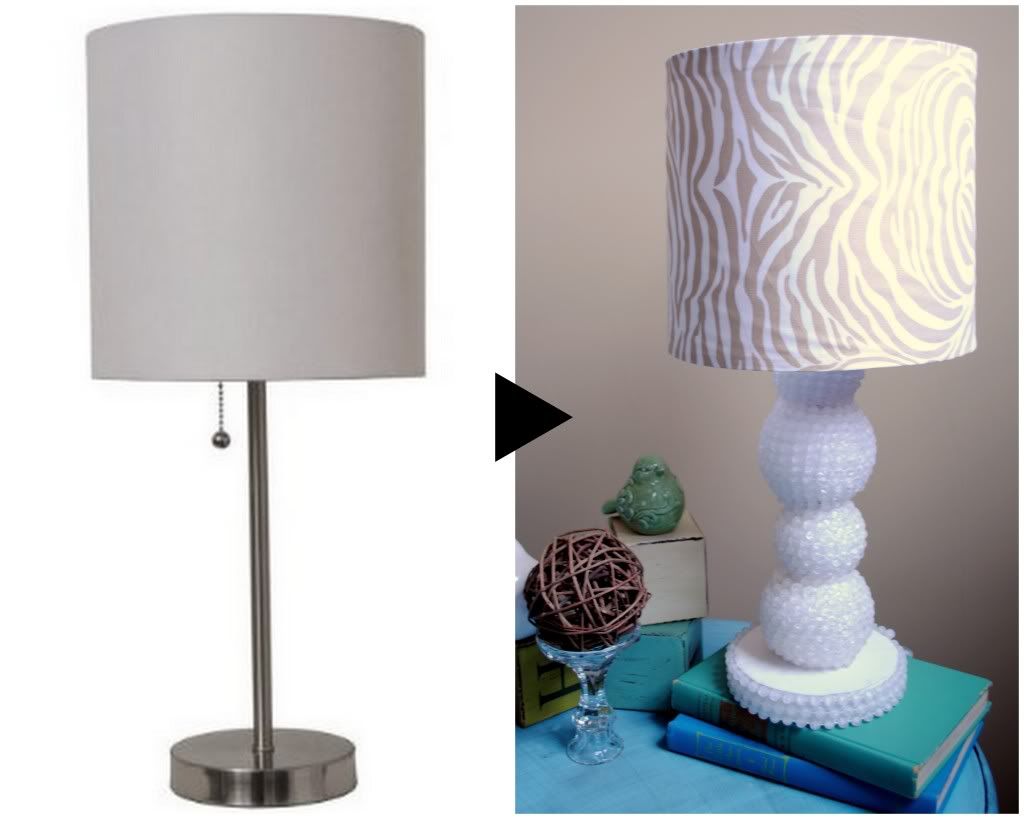
Most lamps are uber-expensive. No matter the design, pattern, or size, more lamps that I drool over cost around $90-$150 dollars. Yikers! So I decided to design my own....
I don't know the technical term, but I wanted a lamp base that had "stacked ball" look. I wanted it to not only serve as a light source, obviously, but I also wanted it to be an eye-catching accent piece in the room.
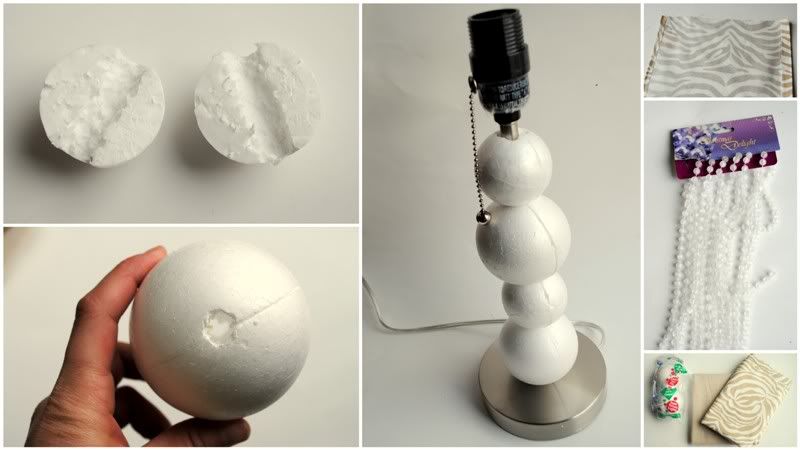

To get the "stacked" look, I took styrofoam balls and I drilled holes through the center of each one. Then I cut it ball in half and hot glued it to the metal rod of the lamp. Once I attached the balls to the lamp I then primed the entire lamp base.
While, the base dried I made a removable lamp shade cover. My sewing machine has been acting up so I had to make my slipcover without using my machine (GREAT news for all of you non-sewers)! I used Heat n' Bond to hem the edges of the fabric and then I also used Heat n' Bond to attach the ends together to make the cylinder shape.
Once I finished the zebra cover, the lamp base was dry enough to attach the beads. I used Christmas bead garland to give the base texture. I super glued the beads around the base and around each ball.
Super simple, folks. no joke.

Supplies...ready. Stop watch...ready. Children... safely locked inside the house with instructions NOT to open the door unless someone is bleeding or on fire. Me... quietly repeating "you can do this, you can do this, you can do this...an hour is plenty of time..." Ready, set, (say a little prayer) GO!

(Children open door-being the good mom I am, I tell them I will be there in precisely 23 minutes!) Line the planter, fill the planter, add the flowers, check the stop watch..... 48 minutes!!!! 47 min. and 56 sec. to be exact. WA-HOO!!! I did it, I did it! (insert very happy dance here, ignore on-looking neighbors)

One Wood Slat Flower Box done, start to finish in under an hour. One completely relieved and happy crafter...ready for a nap! THANK YOU for such a fun month. I have loved every exciting (and anxious) moment! One Month to Win It-you're a Rock star!!!
Project #3 -- Block Puzzle 
The theme this week: Power Hour....really stumped me for awhile! I finally came up with these cool puzzle blocks, which my daughter absolutely loves to play with. It is six puzzles in one-with different fabrics for each side serving as the scene to put together! 
It's simply squares of fabric, cut to fit 2" wooden blocks, and then mod podged on! (I have to admit, I had to hustle to finish it in the hour alotted-but I did!) I picked out cherries, flowers, whales, animals, bicycles, and owl fabric for a fun look and kid friendly puzzle. 
It has different levels of play as well! Have a baby or toddler who likes to play with blocks? She can stack them up and knock them down. (what toddler doesn't love that) Have a preschooler? Have them turn them all over to the same side, aka a matching game! For older children (and yourself ;) fit the blocks together like a puzzle. It's harder than you think! Happy Puzzling!

So instead of paying a $100 dollars on a lamp, I only paid $30 for my awesomely shabby chic room accessory. And the best news of all...do you wanna know? Doya? Doya? Because the lamp shade is removable I can change it out to fit any room, any color, and any design.


15 minutes in...we have a flower box! 20 minutes in...stencils applied and ready for paint! 37 minutes gone by and we are painted, sanded, and stained.


Time for vote for your ONE favorite project!
Come back Friday to see the winner!
Come back Friday to see the winner!
Project #2 -- Flower Box
Super cute stuff!
ReplyDeleteSo hard to choose one! I love all of the projects. Good luck to each contestant. :)
ReplyDeletethis week is REALLY hard to choose.
ReplyDeleteWow, these are so inventive!
ReplyDeleteWow those projects are beyond awesome! Thanks so much for sharing!
ReplyDeletethanks for the comment on my blog today - that block puzzle is unreal! i am totally going to make that, i've got a heap of wooden blocks lying around that would be perfect - thanks for the great idea :)
ReplyDelete