
House Numbers

with these nice new BIG house numbers!
 I used an old shutter, 6 1/2" numbers from the craft store, some thrift store stars and a larger one I cut from scrap wood and a piece of leftover house siding.
Arranged my look to how I liked it, painted the numbers and stars and screwed it all in place.....Over time it will have a nice charming weathered look.

Plant Stand/Table
I'm not a girl that loves yard work. I enjoy pretty flowers butI really despise weeding, raking, mulching, toiling, etc. So to
beautify my outside space I've decided that potted plants are
the way to go! I wanted some big planters but I wanted some cute small
ones as well. Cute small potted plants need cute tables right?
Here's my outdoors inspired plant stand/table. I started by making
half inch cuts from a bunch of sticks lying around the yard. (gotta love
free materials right?) Then I glued, sanded, and added polyurethane.
It still wasn't looking quite right and I started to worry a bit.

So I cut a strip of metal to glue and tack around
the outer edge of my table top. That was exactly
what it needed....oh and it also needed some aqua
table legs, because I'm currently obsessed with that
color!

It looks fantastic on my porch....just in case you were wondering.

Picnic Bench
Week 3, can I just say beyond being super excited I am still a little shocked I have made it this far! With that being said this was defiantly a theme that I could have done 100 post on! My outside needs some SERIOUS TLC! With that being said and a huge Thank you for letting me continue in this competition here we go!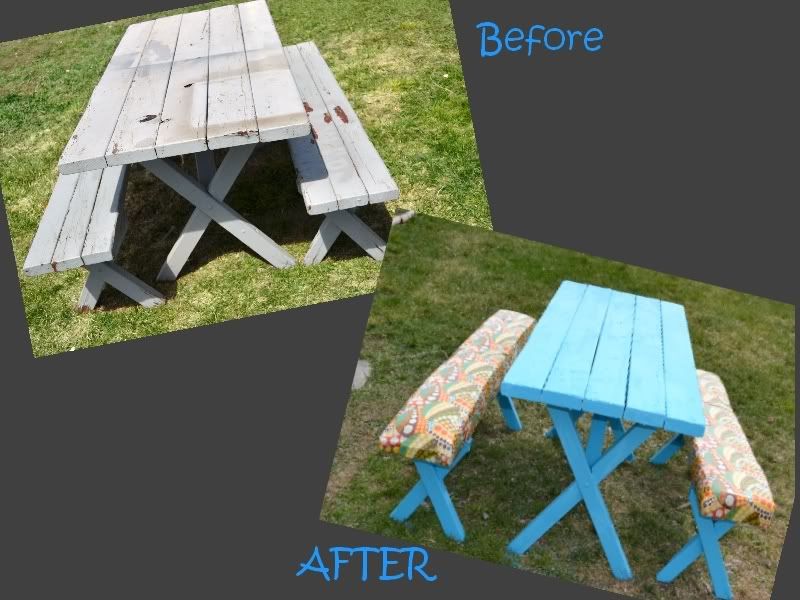
Last summer we were given a wooden picnic table. YEAH! Well it wasn't pretty but the price was right in my budget! I knew it needed a new coat of paint (desperately!) But at the end of summer that was the last thing I do!
I was looking at some fun furniture catalogs (seriously 700 bucks for an outdoor table...OUTDOOR!). I didn't enjoy the prices but loved there super fun cushions and fabrics on all of the chairs. Well that lead to me wanting to add some fun fabric to my picnic table. I headed to the store and found 2 yards of fun bright fabric and vinyl to protect and keep it bright and pretty! For Paint I decided I could just touch up the grey paint color. Once I got home I realized I wanted a bright table to match my fun fabric that I was going to add to the benches. So back to the store and there it was calling me "Seaside Blue", perfect! I Headed home and quickly got to sanding and scrapping.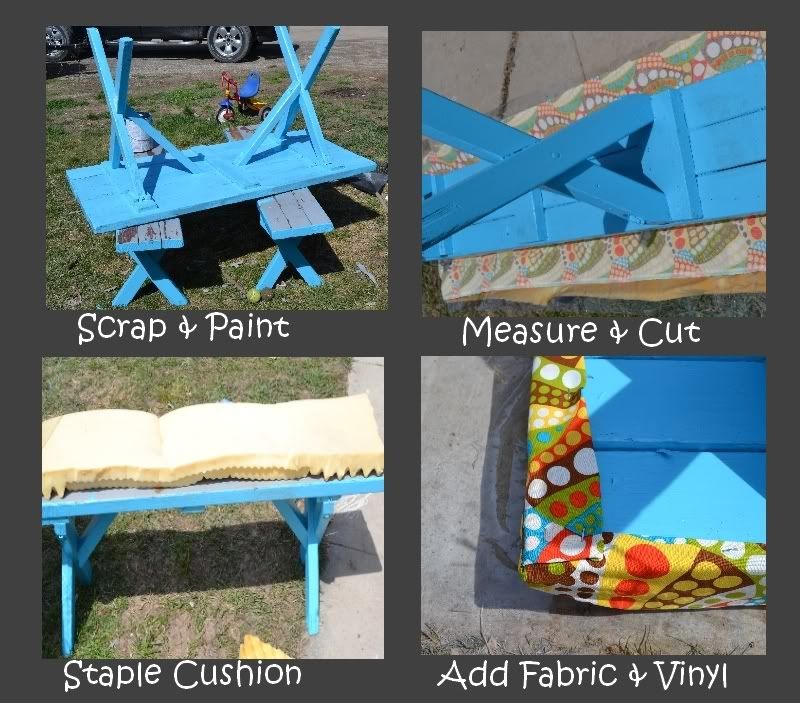
I was looking at some fun furniture catalogs (seriously 700 bucks for an outdoor table...OUTDOOR!). I didn't enjoy the prices but loved there super fun cushions and fabrics on all of the chairs. Well that lead to me wanting to add some fun fabric to my picnic table. I headed to the store and found 2 yards of fun bright fabric and vinyl to protect and keep it bright and pretty! For Paint I decided I could just touch up the grey paint color. Once I got home I realized I wanted a bright table to match my fun fabric that I was going to add to the benches. So back to the store and there it was calling me "Seaside Blue", perfect! I Headed home and quickly got to sanding and scrapping.

I painted and while the paint was drying on the table I got to work on my cushioned seats. I had one of the egg foam mattresses left over in our basement and it worked perfect I simply placed my bench on my foam, fabric and vinyl to measure it. To add my fabric I simply stapled it to the underside of the bench. The corners were a little tricky I folded them then stapled so it came out square. Then I added the vinyl I wanted my fabric to be weather proof and mainly kid proof. I added it next and folded the edges the same way as the fabric.
I am so happy with my results I cant wait until Easter Brunch to show off my new table. What do you think? 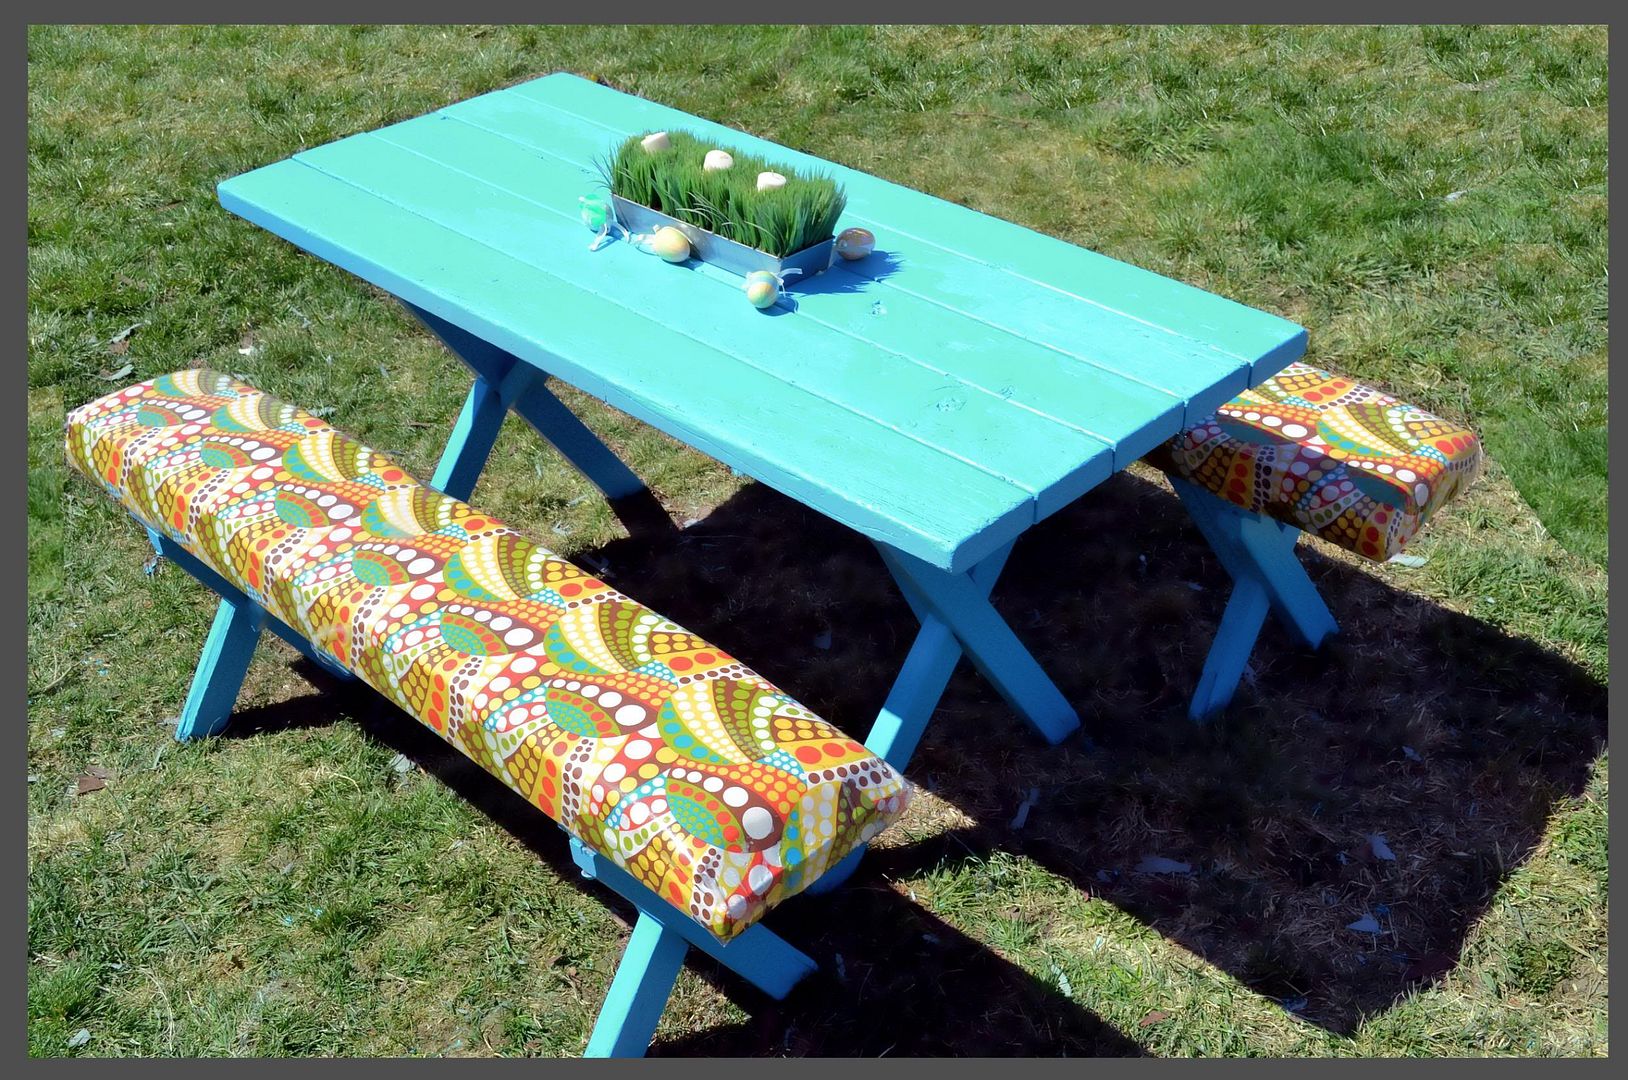 Now what to do with all of my extra Seaside blue paint!
Now what to do with all of my extra Seaside blue paint! Picnic Blanket
With summer just around the corner this week's outdoor craft theme was fun to think about! We live near a park and I'm looking forward to family picnics. I wanted to make a picnic blanket that was waterproof on one side and easy to store so I came up with this design. It features a vinyl table cloth on one side, a comforter on the other side, an attached pocket that the whole blanket folds up into and an easy to carry shoulder strap.

To make this, I purchased a queen size comforter and a matching vinyl tablecloth. I used a seam ripper to remove all the bindng from around the comforter. I then cut both the comforter and table cloth to 60"x75". Next I cut a 16"x16" pocket from my excess comforter material and sewed the binding strips I removed earlier to the top and right sides of the pocket. Then I laid out the table cloth, comforter and pocket (in the lower left corner of the front of the comforter), pinned it all together and sewed the binding strips around all 4 sides and sewed down the right side of the pocket. As a final step, I sewed the yellow shoulder strap to the sides of the pocket.


Blue Twig Chandelier
May I just start off by saying that I normally don't have a tablecloth hanging from my patio cover, but I could not get my "Outdoor Craft" to show up in photos without creating a blank background of some kind.That being said, I made a Blue Twig Chandelier. As the weather gets warmer, it's nice to be able to hang out on the patio, host brunches, etc. I like to pair the whimsical with the traditional when it comes to setting a table, so here we are.
 Gathering up sticks and branches, I spray painted them with Rustoleum's Lagoon blue. When dry, I used 28 gauge wire and hot glue to make a base with the larger branches, then began to layer on the sticks. Once I had a shape that I liked, (and got the darn thing level) I wired on votive cups and used Hubby's fishing line to hang little beads.
(Note to self: return his reel to the tackle box...)
 I knew I wanted to do a chandelier for my challenge. I started several different chandys but couldn't get it right. Once I got "blue sticks" in my head I couldn't get them out. While this isn't photographing very well, it does look pretty cool. (Also, because it took me so long to complete this, I wasn't able to get a photo of it with the candles lit. Sorry.)
And seriously: you do believe me when I say there usually isn't a tablecloth hanging there, right? Right...?
Coffee Table
 I'm so excited to be back again for another week of OMTWI!
I love the "outdoors" theme, and I have a big to-do list for our yard...I'm happy to have one less item on the list now!
So I've had this boring old wicker coffee table sitting in my garage for about a year. We scored a huge furniture set on Craigslist, and when we went to pick it up, the guy just kept giving us more and more stuff...this was one of those items, so it was free for me. Not my style, but free's free, right?
I thought giving it a coat of spray paint (or 3 or 4...CURSE YOU, WICKER!) would do the trick, but after seeing it all white and pretty, it still just felt blah. Maybe something to the glass? I'd seen some fab tutorials on that glass etching stuff you can buy at craft stores, but mostly I'm cheap and lazy, so I really wanted to think of a way I could do a similar effect using things I had at home... And behold, faux faux etching was born. Or "fetching" if you prefer. ;)

What's also great about this method is that it is removable with a little elbow grease! You'll really need to scrape it and wash with warm soapy water, but if you should ever decide to change it out or get bored with your design, you're not stuck with it! Awesome for the fickle decorator like myself!!

This comment has been removed by the author.
ReplyDeleteWow! Those were such great ideas! You have definitely inspired me to try something different!
ReplyDeleteThank you for sharing! They all look great!
Um...holy smokes ladies! Everything looks amazing!!
ReplyDeleteGreat ideas this week! Good job all. :)
ReplyDeleteWow, these project are great! Good luck everyone.
ReplyDeleteLOVE all the projects this week!! Good Luck everyone:-)
ReplyDeleteMakes me want to get outside and work on the yard! Inspirational. :)
ReplyDeleteYou all made wonderful projects! Good luck!
ReplyDeleteEverytime I see these kinds of projects it makes me wonder why I'm so hesitant to tackle them because they're so awesome in the end. Great job all!
ReplyDeleteYou know it's a good contest when you're almost tempted to vote for someone OTHER than yourself! Ha!! Great job, ladies!!
ReplyDeleteThese are all great! I love seeing what you guys will come up with :D
ReplyDeleteThis is the first time I've been soooo torn! I loved the plant stand AND the blue twig chandelier! They were all great projects.
ReplyDeleteGreat work again ladies! It's always so fun to see everyone's different ideas for the same theme.
ReplyDeleteI voted for the coffee table for it inspired me to etch my glass within my home...Yea!! Tootsie
ReplyDeleteI really inspired to try something different...I really like the coffee table.
ReplyDeletewindow shutters clayton, ca