
Number 1: Strie Sidebar
Have you ever seen something on the side of the street that you just HAD to have, but you were too embarressed to pick it up? That was me with this sidebar. The piece was on the front street of our little town and while I usually don't mind freecycling, it was a very public freecycle. 10 minutes after arriving home, I loaded up the kids again and went out to pick it up. It was THAT COOL of a piece. Of course it didn't look all that great to start with (see below), but a little bit of paint goes a LONG WAY! I painted the {free!} sidebar with a strie technique using a combination of craft paints and wood stain applied with brushes and rags. I wanted the whole wall section to be a cohesive whole, so I used my Decoart paints and some other yard sale and auction finds to create a garden themed vignette.

Are you wondering what this sidebar looking like before?

Total Cost: around $20 for supplies and accessories!!
Number 2: Wooden Canvas Art
I made it to round two?! Yay!! I am so happy because I love to paint and Deco Art products are right up my alley. I probably could have just used paint I had on hand (seriously I may or may not have a drawer full of Deco Art paints). I had something special in mind though. Initially I was going to do some pallet art. Have any of you ever tried to ACTUALLY take one apart?! Yeah I passed on that after 30 mins. So plan B: Make a "canvas" out of boards and weather it myself. 


Number 3: {New} Laundry Room Sign

Yay! I made it to Round Two! {Whew!} What an amazing group of projects we had in Round One!
For this round I chose to make a {new} laundry room sign from an old cabinet door!

I've had this old cabinet door forever! Finally got around to making something with it! Yay! Thanks, OMTWI! :) Basically I cut some vinyl using my vinyl cutter, it's digital design & software. I used the vinyl negative {the part you usually throw out} to make a stencil that fit my board perfectly. I used DecoArt Designer Series All-Purpose Acrylic Paint in white in this project. I really wanted to try the DecoArt Stencil Paint but they didn't carry it at my Hobby Lobby. :( The DecoArt acrylic paint worked pretty well though! Yay! I did had a few hiccups & change ups along the way, but I LOVE how it turned out! After I was done with the words I slightly roughed up the cabinet door edges with sand paper & then hung it on the wall. That's it!

I love, love, love it! I keep going in my laundry room again & again to look at it!
You'd think I'd get more laundry done this way...but no luck! Still got piles & piles of laundry to do! :)
So, I'd better get busy! ;)
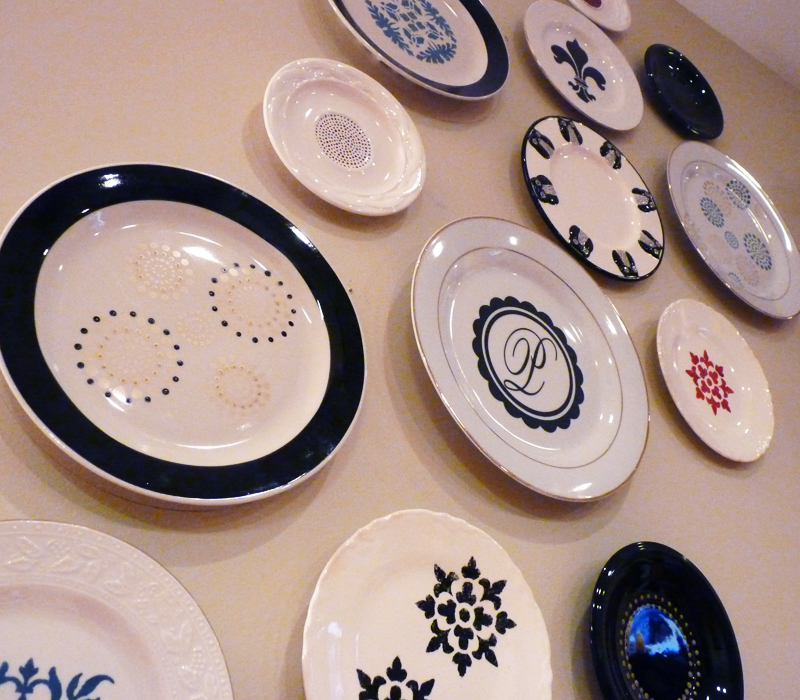
Number 4: Hand Painted Plate Wall
I.love.plate.walls. I just do. I can't help myself. I've been trying to find an inexpensive way to create one in my home and a few months ago, I had a EUREKA moment. Collect a bunch of Goodwill/Habitat Restore plates and paint them. I've been buying up plates every time I come across one that I like and I finally had enough for this project!
I gathered some DecoArt Gloss Enamels in the colors I wanted to use (Calypso Blue had to be mixed with a little black and white to achieve the steely blue I wanted), bought some stencils at Hobby Lobby and went to work! But before I started painting, I laid all of my plates out on kraft paper in the design I wanted. After I traced around each one so I would remember my design later, I decided which stencil/pattern I would use for each plate and attached little post-its as reminders of my plan. This way, I would make sure that the plates next to each other didn't have similar patterns and/or colors.

I had 14 plates, but decided to leave 2 unpainted. It only took me maybe 2 and a half hours total to paint these (after a few mishaps - please when stenciling, get almost all of the paint off your brush!)
And here she is!

I decided on an asymmetric design and I must say, I love it! I'm usually a symmetrical person but I'm trying to step out of my comfort zone a little bit and thought this was the perfect opportunity!
Large plates = $2 (50 cents each)
Small plates = $2.25 (25 cents each)
Owl plate: $4 (Found it at TJ Maxx and couldn't resist including it!)
P Monogram = $2 (Bought from Groopdealz months ago, not knowing what I would use it for)
Paints = $4 ($1 each, already had black)
Stencils = $8
Plate hangers = $32.50
Total Cost for Hand-Painted Plate Wall = $54.75
It makes much more of a statement than those three frames I had before. Now I have something that makes me giddy every time I walk into the room!
Number 5: Gold to Gray Painted Chair
This was a hard week for me. DecoArt has some great products, and I love paint! It was hard to decide, but after I found this great (but ugly) chair at the thrift store, I decided to paint it. I decided to use fabric paint, but could not find any locally. Then I saw the Fabric Medium by Americana, a DecoArt Brand. I thought I would use it with some latex paint, and Voila`! The chair was painted. And it is not crunchy!

I wanted a little accent, and we have a dark grey couch, so I made a slip cover for the seat cushion. I finished the edges with piping, and added some quilt batting for softness.

Now, it's a great chair to lounge in and read a book...like my model!

Number 6: Decoupage Table Top
Wow! Thanks so much to everyone who voted for me and put me through to the next round! I feel so blessed and honored!When I saw what this week's challenge was, I knew exactly what I was going to do. My husband built this coffee table from scrap wood he had about three years ago and it's been sitting in our garage giving me the stink eye ever since. Up until now, we have had no coffee table in the living room so our monsters would have more room to

Well, it's due time and I have been wanting to wallpaper the top of the table for awhile now and so I decided to do just that! -- Kind of.
I started off by spray painting the whole thing, except for the top, with a high gloss white spray paint by Krylon. After drying, I found some high quality gift wrap I loved and then used this wonderful product from Decoart called Decou-page:

I used a foam brush to apply the Decou-page to the top of the table and carefully laid the paper (which I cut to fit the table just perfectly) on top, applied a few more coats on top of the paper to make it shiny and Voila! -- A beautiful and unique coffee table to fit our home just perfectly!

Hope you're having an awesome day!
Number 7: Modern Art Thumbprint Tree

If you have kids in your life, chances are you’ve acquired an art project or two that have been deemed refrigerator worthy. As cute as most of their little projects are, you may not hang them on a main wall of your home as a focal piece. Well, I have a project that includes your little ones thumbprints, that will look good enough to hang in an expensive gallery when it’s finished.
1. Base coat your canvas. To give the background depth and movement, use a monochromatic color and add swirls. I used Baby Blue by DecoArt for my swirls.
2. Use a paint pen and sketch your tree design, with lots of curls and curves in the branches, then paint it in. For this I used Asphaltum (brown) by DecoArt. When it’s dry, you can add a bit of white for highlighting the trunk and branches.

4. When the little thumb prints are dry, it’s time for the final details. This is also where you can cover up any little boo-boos that the kids might have made. I used a white paint pen, and added circles around some of the thumbprints, as well as dots in the centers of others. I also added a few small dots all around the canvas. This is like the icing on the cake, giving your canvas just the right touch. I also let my kids sign the sides of the canvas and included the date, for one more personal touch.

Gallery worthy? Yes, I do believe so!
Number 8: Meaningful Kitchen Space
Yayyyyy I am SO thrilled and honored to be a part of the second round of One Month To Win It!!!
I LOVE painting EVERYTHING soooo I really really enjoyed this challenge----to use Deco Art paints!
I used white stencil paint for the background of my special sign,
I also used Spa Blue and Black Designer Series paints to paint the table the dark color and to paint the sign the light blue----I used white to dilute both to get the exact color I was wishing for.

This corner of my kitchen to this point has not felt complete---soooo
I dug around my house and found this table to up-cycle.
I have been wishing to paint a dark piece of furniture for awhile now----I am glad I had the motivation!

Anddd stenciling and adding lyrics from a very special song to the decor makes this space meaningful!
Just the way I like it!

Number 9: Proverbs 31 Sign
I have been wanting to make something for our home that displays some scripture, something that will remind us of the most important things in life. I chose to use Proverbs 31 because that is a lady I want to be like. Someone who is the keeper of her house! So... I took a plain canvas and used a metallic Deco Art paint writer. Not every verse could fit, so I chose the ones that I need to be reminded of. :) I wrote out the words with the paint writer, and painted a frame that I found at Hobby Lobby on clearance. The canvas fit right inside. Then I added my favorite, felt flowers.

I love how it turned out! One of my favorite verses is she does not eat the bread of idleness, that is something I really need to remember! ;)

The paint writer was very easy to work with and I love how it gives it an embossed look. This is a great reminder to have displayed in our home!

Voting Time! Please choose one!!
Awesome projects everyone! This is super exciting!!
ReplyDeleteOh my goodness! Everyone did sooooooooooo awesome! Wow! :)
ReplyDeleteGreat job to all! So hard to pick just one! Love all the inspiration!
ReplyDeleteGood job ladies!
ReplyDeleteloving this week!!!
ReplyDeleteOh wow! I'm so impressed and inspired! This is surely going to be a close one this week, they're all so good. I'm so honored to be participating!
ReplyDeleteToss up between the laundry room sign or the plate wall. All are awesome, but those are the two I can see myself doing.
ReplyDeleteWow! That was a hard one to pick just one!!!
ReplyDeleteGood job, girls! Can't wait to see next time's projects!
ReplyDeleteThis is really nice and creative!
ReplyDeleteGreat projects this week! I LOVE paint, so this was exciting to browse! I voted for my favorite. Good luck ladies!
ReplyDelete