Number 1: Sheet Music Chalkboard Tray
Hi OMTWI readers! I can not tell you how excited I am to be back with all of these talented ladies for Round Two – thanks for voting and keeping me in on the fun!
This week’s challenge was to use DecoArt products. Since I have a fondness for all things vintage, I decided to mix a few DecoArt products to create a time-worn look for my Sheet Music Chalkboard tray.
I painted the tray interior with two coats of DecoArt’s Americana chalkboard paint and decoupaged the exterior of the tray sides with strips of sheet music. Then, I lightly brushed DecoArt’s sky blue acrylic paint to the interior and exterior of the tray sides (over the sheet music). Once dry, I applied DecoArt’s One-Step Crackle coat, then added some patina to the crackling with DecoArt’s staining medium mixed with some dark umber acrylic paint.
And since breakfast in bed is not quite the reality around here, I decided to try out my new tray for other purposes… a place for keys and daily reminders… and a makeshift in/outbox for that neverending pile of mail! It’s also a great place for some coffee table tic-tac-toe…
I love the way the sheet music peeks through the crackling blue paint…
Thanks again for allowing me the privilege of crafting with you for Round Two. I hope you are inspired to play with craft paints in new ways to create beautiful, useful items for your home.
Oh… and you know I don’t want to go home yet, so your vote would mean the world to me!
Best of luck to all of the contestants!
I'm so excited to have made it past week one! This week's challenge was really hard because there are so many awesome DecoArt products, but very limited selection in my area. Possibilities were endless for this week, but I just happened to come across some free molding...which may have been found in a dumpster at a construction site...anyway, FREE! My project ended up costing me approximately $3 because I used what I had on hand and only had to buy the DecoArt Americana paint in Buttermilk and Chocolate! |
I love the colors and pattern on the frame and it will be very useful for my daughter. I'm really loving the animal prints this year! Please VOTE! |
Number 3: Whimsical Tuxedo Chandelier

Wow--uhh--okay. DecoArt paint--?? Not really a "crafter," I had to go to their website to see what it was.
When I saw Glass Paint listed---my imagination went from 0 to 65 in about 2 seconds!
Although [they] did not expand on its usage, it didn't say anything like "Not for chandelier crystals, missy!" so I thought-- "Heck yeah! This could be a whole 'lotta fun!" I dragged through my crystal stash (yes, I collect that too!), found the DecoArt Crystal Gloss Enamels paint I wanted in transparent black, & white. Because I wanted to paint both sides, I had to create a way of hanging them. --To dry and, because you have to bake them! They were pretty just black, but I had the idea of ultimately creating a"Whimsical Tuxedo Chandelier!"
Which also meant I needed something fitting for lamp shades. Having nothing suitable, I ripped up some shades found at the ReStore. They were ruined by someone using too high a wattage bulb--don't do that! I spent a few hours ripping the fabric off--Not.Fun.
--6 shades, and 6 yards of black tulle wrapped the frames, tying a bow with the beginning & ending tails. And for extra whimsy, hot-glued, old pearl buttons! I also thought it could be fun for a young girl, and began re-setting the whole thing on the pink chandelier earmarked for my little nieces!
Number 4: “I’ll Fly Away” Sign
This week's challenge was pretty exciting. DecoArt makes so many different pr oducts and types of paint, it was pretty tough to choose just one project. But in the end, their regular craft paint was exactly what I needed. I love vintage signs and have wanted to make my own version for awhile. This seemed like the perfect opportunity.
I love the old gospel song "I'll Fly Away" and decided it was the perfect message for my sign.
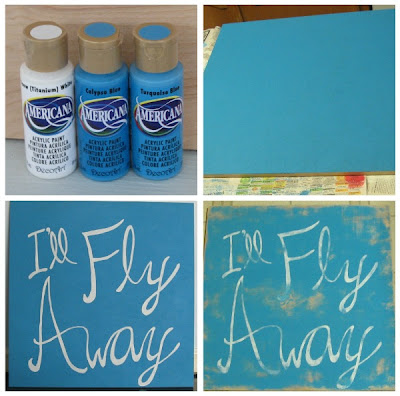
I started with three colors of paint and a 2'x2' piece of plywood. I painted the Turquoise Blue right onto the wood and then randomly dry-brushed on some of the Calypso Blue to add some dimension. I drew the letters with pencil and used a tiny paintbrush and white paint to fill them in. Then came the part that is always a bit scary - I sanded off a bunch of the design I had just painstakingly painted. Yikes. I wanted this to look like it had some age, so I sanded it pretty heavily. To finish it off, I rubbed dark stain all over the entire sign.
The result is pretty authentic looking if you ask me. Plus I get a burning desire to start tapping my foot or burst out in song every time I look at it. And that's always a good thing.
Number 5: Frame Ribbon Organizer
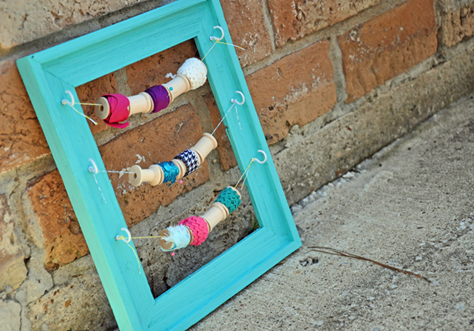
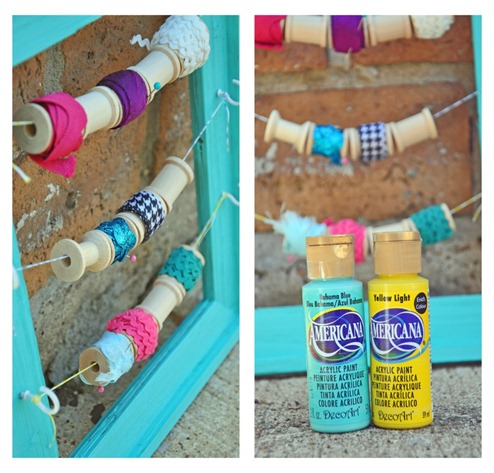
I’m so excited to be back again this week! It took me so long to decide what to do…so many choices! I am trying to organize some craft supplies, so I decided to go with something to help me with that! I used the acrylic paint to add some color to an old picture frame that I am using to display some ribbon scraps.Not only is it function to store all those little pieces you have left over, it is a great piece of art!!All I did was paint the frame, add the hooks and I used DIY colored bakers twine for the string. String on the wooden spools and tie it off... super easy!
I am am loving how it turned out! The wooden spools make me giddy and I can't wait to keep adding my supplies!I have used several DecoArt products in the past. (Their acrylic craft paints and pearlizing mediums work great on wood, paper, and canvas.) But I wanted to challenge myself and try something new, so I picked up some DecoArt Gloss Enamel and painted on glass.
I turned some plain ol' glass cylinders into a pair of bold striped vases. The best part? The whole project cost me less than $7. (I love an expensive decor projects, don't you?)
First, I cleaned my glass with rubbing alcohol according to package directions. Then I measured my vases and taped off my stripes using blue painters' tape. (Tip: Use the metric system when measuring stripes. It is SO much easier to do the division!) Next, I painted the entire inside of my vases turquoise and then painted my white stripes on the outside. Once I got the coverage I liked, I carefully removed the tape and dried the enamel in the oven as directed. Viola! I now have two graphic vases to use however I please.
For the time being, I added fresh flowers. The bold glassware adds a whimsical twist to some traditional flower arrangements. How fun would these be for a party! You could customize the colors to coordinate with any palette. (I'm envisioning black & white stripes with red roses for an Alice in Wonderland theme...or gray & white stripes with yellow craspedia for a contemporary wedding centerpiece...so many possibilities.) I can't wait to experiment with more colors and designs!
Number 7: Turquoise Lamp Makeover
Number 8: Grandma's Brag Blocks
I'm so excited and honored to have made it past the first round of competition! There were some pretty amazing projects put forth last week, and I'm sure this week will be just as inspiring (and intimidating)!
For this week's DecoArt challenge, I wanted to try to flesh out a project that had been floating around in my head for some time - sort of a shadow box frame that could hold photo blocks for my Mother, an idea which became Grandma's Brag Blocks.

I had great intentions of finding a cool thrift store frame to use, but after scouring three different stores in the area, I had to go to plan B - an open back frame from Hobby Lobby for 50% off. It ended up being only a little more than the prices I was seeing for frames at the thrift stores. I painted the frame with DecoArt Desert Turquoise Americana acrylic paint, then mixed and applied a wash made from water and DecoArt Raw Umber to get into the nooks and crannies. I ragged most of the wash off using scraps of an old t-shirt. Finally I used DecoArt DuraClear gloss varnish to seal the paint and give it a brilliant shine. I ended up with an accidental faux verdigris finish that is really pretty!
For the shadowbox and blocks, I built a box to fit in the frame from a piece of plywood and some poplar 1/4"x2" pieces of wood. I cut and sanded the 2"x4"s to fit nicely in the frame. I brushed on the same wash to stain the blocks and then decoupaged the trimmed photos to both sides of the blocks.
Now Grandma can swap and rearrange photos as she likes, and I can always make additional photo blocks as grandbabies get older.
Number 9: Thrift Store Table Makeover
Hey there! First, let's talk about how I'm super excited to have made it through the Week Two of OMTWI! Yay!
So, I was at the thrift store and I spotted this hideous table. It had good bones, but the hinges were all shoddy (pins were missing and replaced with Q-tips. Q-TIPS, people!!) and it was seriously not-my-style. But the price was low. They were practically giving it away. So I kept making my way back to it and finally decided (against my husband's pleas to please not bring anything else for the garage) to bring it home! And boy, am I glad I did!
I started out by removing the hinges, cleaning it up and sanding it down. Then I applied a couple coats of primer and allowed that to dry.
The best part is that it was cheap! A little goes a long way with the DecoArt paints I used, so I still have several projects left out of them.
What do you think? Worlds better, right? I think it'll go perfectly in my craft room! :)
So, I was at the thrift store and I spotted this hideous table. It had good bones, but the hinges were all shoddy (pins were missing and replaced with Q-tips. Q-TIPS, people!!) and it was seriously not-my-style. But the price was low. They were practically giving it away. So I kept making my way back to it and finally decided (against my husband's pleas to please not bring anything else for the garage) to bring it home! And boy, am I glad I did!
I started out by removing the hinges, cleaning it up and sanding it down. Then I applied a couple coats of primer and allowed that to dry.
I painted the whole thing with DecoArt Designer Series All-Purpose Home Decor Acrylic in Lush Foliage. I LOVE this stuff. I put on just two coats and everything was completely covered! You know when you're making something and you get an endorphin rush because of how great it's turning out? DecoArt Designer Series in Lush Foliage = endorphin rush.
Once the paint was dry, I added brand new hinges and freehanded some polka dots on the top of the table and filled them in with DecoArt Traditions Artist acrylic in Warm White.
I gave it a day or so to dry and sprayed it with a poly coat.
The best part is that it was cheap! A little goes a long way with the DecoArt paints I used, so I still have several projects left out of them.
What do you think? Worlds better, right? I think it'll go perfectly in my craft room! :)


Great crafting everyone!
ReplyDeleteMy husband's favorite song is, "I'll Fly Away." I think I'll be singing it all day now!
Interesting ideas, like the painted chandelier crystals. I suppose the possibilies are endless.
ReplyDeleteIf you click on some of the smaller photos you can see the projects better. Looks like everyone is having fun, great job ladies!
ReplyDeleteLove the Grandma's Brag Blocks! Need to start working on that project for Christmas 2012!
ReplyDeleteNeat projects!!!
ReplyDeleteOmgoodness--no offense to my fellow-contestants, but,
ReplyDeleteI think we've all been OUT DONE by the
GRANDMA'S BRAG BLOCKS!
That is absolutely-incredibly-so cool-creative!
Catherine
I don't get the brag blocks. Does it hang on the wall or just take up room on the table???
ReplyDeleteIt hangs on the wall. The blocks fit snugly together so they don't fall out.
ReplyDeleteWow. Another tough choice!
ReplyDeleteOh that was a toughie!!
ReplyDeleteI think EVERY project is a-MAZing!!! Lisa~
ReplyDelete