
Welcome to week 1 of our newest season! This week's theme is sponsored by Krylon. Let's see what fabulousness our contestants did with Krylon products!
VOTE FOR YOUR FAVORITE!!!
Number 1: Boy's Room Mobile
After our daughter got a major bedroom makeover, I decided that her brother needed a little sprucing up in his. It's been a slow process, but one thing that he loves about his sisters bedroom is her awesome butterfly chandelier. So, he placed an order with his mother (me) for a similar one, but he requested "TRUCKS!"
I said, "Yeah! I can do that!" And I got to work,...
Started off by collecting my materials: Metal ring, wooden shapes including "TRUCKS!", wire, leather craft lace, and most importantly Krylon spray paint.

I primed and painted the wooden shapes and the metal hoop. Then, I drilled a 1/8 inch hole at the very tippy top of the shapes and threaded the leather lace through. I cut the lace at various different lengths and hung it from the painted wire hoop by looping it around and securing with my hot glue gun.

Lastly, I screwed a hook in to the ceiling just above his bed and hung it up. Voila! All done! My little guy told me he "loved me more than ANYTHING" when he saw it. So, I guess he likes it! ;)

I hope you're having a happy day! :D
Number 2: Yard Sale Chair Makeover
When I found out the first project was Krylon spray paint, I did a little happy dance. I. Love. Spray. Paint. All the times I have gone a little spray paint crazy, I have never spray painted furniture. What?! I know get with it right?! So I decided to spray paint something I had on hand and I think the fumes may have gotten to me because the fabric got some spray paint as well. I took this $4.00 yard sale chair and turned it into this:

I used Krylon's Gold Metallic for the body and Krylon's Flat Black for the fabric. I first sanded down the frame slightly. Then popped off the million staples the last person put onto the cushion. That was fun! I added the top cushion by stapling a piece of foam I cut to size. I then added the fabric I spray painted with staple gun and hot glued the trim. I did the back by cutting a piece of poster board I had on hand, then added batting, fabric, and a nice decorative trim to hide the staples.

The lovely end result:

Sigh...Hard to believe it's the same chair. It was worth having to ice my hands for a day from the staple gun. Note to self: buy better staple gun.
Number 3: Krylon GLAM-Pire
Number 3: Krylon GLAM-Pire
A pair of boots from the past, with a little glitter blast
And a handmade cape blinged from toe to nape
Put it all together, this little number is on fire and
fabulously creates the one and only KRYLON GLAM-pire. 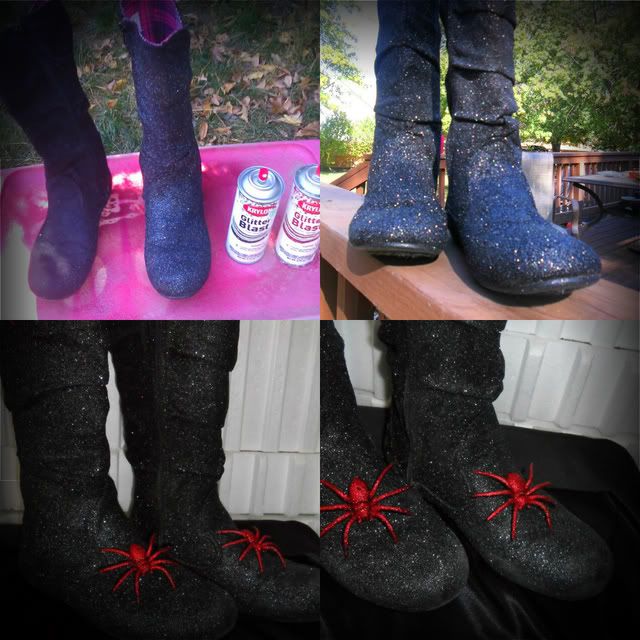


Number 4: Beaten Up Dining Chairs to Fab New Poker Chairs!
I bought a set of six old dining room chairs at a yard sale last year (yes, I said last year) and they have been sitting in our garage since then, just awaiting the kick in the rear I needed to get them done! Thank you OMTWI! They were old, disgusting, and all beaten up, but with some spray paint love, they look good as new!

The chairs were $15 for all 6 (score!) and the fabric was $5 for an entire bolt at Walmart (double score!)

I went with a masculine color scheme for the chairs because these are going around the hubs' poker table where they will mostly be used by his poker buddies. The Krylon Smoke Gray, in combination with some leftover black latex paint I had in my stash which I used for the back, is the perfect manly color.
2 cans of primer, 9 cans of spray paint, and 15 hours of work later...

...and we have a much needed upgrade to our game room!
The hubs is so happy that his friends' hineys can now be comfortable for their regular 8 hour poker tournaments (and I'm happy that those dad-blasted folding chairs are relegated to the seldom-used workout room). It's a win-win!
Number 5: A spray painted, up-cycled trunk.

I am SO thrilled to be part of round 1 of One Month To Win It!!!
I LOVE spray paint so this challenge was fun for me!
Along with spray paint, I LOVE up-cycling...

And I love special quotes.
Anything with meaning really sooo---
I incorporated everything that I love into one!

The frame was sprayed to match and holds hand written notes that I found in a vintage educational book.
Because school was most definitely the thing that I think of when I read and admire this quote
Number 6: From Goodwill Picture to Eat Sign
When I heard the first challenge was spray paint I was so excited, since it's one of my favorite things! So, I went hunting at the Goodwill for some inspiration when this picture jumped out at me, I just knew how I wanted to transform it.

After I took it completely apart I had 3 separate pieces. The frame, the outside mat, and the inside picture. This made it easy to paint each one. I used Krylon Cherry Red for the frame, primer gray, and flat white.
I wanted to add another element of texture, so I cut lots and LOTS of circles out and used Modge Podge to glue them onto the picture. After that, I painted over them with the flat white.

I glued the painted letters on, put all the pieces back together, and it here it is! I love the results!! The circles in the middle give it something extra and fun, but it's subtle at the same time! It looks perfect in our kitchen I just want to stare at it all the time ;)

Number 7: Screen Makeover

So I had a busted up screen that my babies had kind of killed.
We also had an issue with too many people at one door trying to get their shoes on and out the door.
Solution? A little bit of Krylon paint to create a rich wood effect on the screen, a new backing from an old sheet, recycled tin cans and glass candle containers turned into a living wall and I have a beautiful, functional storage wall where I can get myself put together in peace every morning.

The paint I used to create this effect was Krylon Coral, Krylon Reactions Paint and a deep rich brown with hints of metallic that I layered to form a dynamic finish. Vote for this project to learn how to attach the jars and cans, attach the backing so it is still easy to string scarves through the loops, weight the screen properly so it doesn't fall over and how to arrange the items based on triangular design!

Number 8: {Outdoor} Chalkboard with Matching Desk
I'm honored, excited, nervous, happy, overwhelmed {all rolled into one!} to be here in Season 6. When I saw that Round 1 was Krylon Spray Paint...to tell you the truth I was a teeny bit nervous. {OK....let's be honest... I was freaking out! ;)} I'm a stir the paint, break out the paint brush & overalls, slap the paint on real thick kind of girl! So, spray painting was a little bit out of my comfort zone! But hey, isn't that what a craft competition is all about? Stretching yourself & trying out new things! {Plus making new friends...LOVE all the girls in this season! Good luck, everybody!!} So, I gave it a whirl and made this {outdoor} chalkboard & matching desk! Love how it turned out...spray paint & all. ;)

It didn't take me long {about a minute!} to decide which Krylon product I wanted to try out....the Krylon Chalkboard Spray Paint. I've been wanting to try out some chalkboard paint, so this was the perfect opportunity! I'll share the WHOLE tutorial over on my blog after this week's winners are announced, but here's the short version. Just so you know everything on this chalkboard is weather-proof. It's all plastic, but you'd never know!

1. First we measured & cut the frame. You can buy this same trim at Lowes. It's plastic but cuts like wood! You can paint it, too! Amazing stuff!
2. Then we painted the future chalkboard with Krylon Chalkboard Spray Paint. {This is a fluorescent light cover!} I'm not going to lie...it took several coats of paint! I went through 2 cans of spray paint. My trigger finger was a little sore, but so worth it! :)
3. Then we screwed the frame together, & then we painted the frame a vintage blue color. Love! Then we stapled gunned the chalkboard into place.
4. Added some shaker pegs along the front. Then hung our chalkboard {outside} on our fence! {No chalkboard dust in the house! Yippee! :)}

Since I was out painting I decided to grab this cute desk down from the attic. My husband's grandfather made it a long time ago, & it was in the need of a makeover! I used the Krylon Chalkboard Spray Paint on the writing surface & then painted the rest of the desk yellow & white. Love how it turned out! So cute!! FYI: The Krylon Spray Paint worked awesome on the wood. I think I needed only two coats. Much better coverage than on the white plastic. So, there you go my very FUNctional & cute {outdoor} chalkboard & matching desk! My kiddos are LOVING it! It would be an honor to have YOU vote for me! Thank you so much! :)
Number 9: Girl's Desk Makeover
When I heard this weeks challenge was Krylon spray paint, I knew exactly what I was going to do. I had found this desk at a garage sale and knew I wanted to use "Banner Red" to paint it. I had to first prime this piece, so I chose Krylon's Ruddy Brown Primer. I had 2 other brands of half used rusty-colored primer, and the Krylon was by far the easiest to use. I love the 360 nozzle and it is very finger friendly!
I had bought the fabric (Amy Butler Lotus) to use as pillows in her room, but wasn't committed to that project. I knew the side drawers would look great in contrast to the desk color. I used Modge Podge to put the fabric on.

My husband helped polish up the brass pulls, and I painted the groves with some gold glaze. The lamp, chair and Statue of Liberty book ends were all thrift store purchases. The print says "I love NY".

My daughter loves her new desk!

Number 10: Corner Chair Transformation
Spray paint scares me a just a wee bit. I faced my fears head on though and went searching for the perfect color to transform a corner chair we recently received from one of my husband's relatives. I'm a lover of stained wood furniture but I wanted to do something a little more fun and unique with this piece. I gathered my supples and got down to the business.

Despite my husband's assurance that it wasn't necessary, I sanded down some of the finish on the chair (not down to the bare wood though). Then, I grabbed my spray primer and gave the chair a good coat. Once the primer dried, (hello, 10 minute drying time!) I grabbed my spray paint can and got busy.

Two coats was all it took in most places which totaled less than 2 cans of spray paint. After a quick cover change thanks to some fabric from the remnant bin at G Street Fabric, this little chair was ready for prime time.

Number 11: Bouncing Horse

With Krylon Fusion for plastics paint, I made over an old, dirty bouncing pony into a like new pony any little cowboy will love! I used brown, black, red, and the outdoors clear coat.
First, I had to take Pony apart, and give him a good scrub down. I washed him in bleachy water to remove all the mildew and gave the meta a scrub with a grill brush. Then, I followed the instructions on the Krylon paint for prepping the plastic surface, and I was good to start painting.
I used the three colors, and covered each with blue tape when I added a new color. After that, I used a paint pen to add smaller details.

Afterwards, I used Krylon Fusion for plastic clear coat to prevent scratching and wear.

This isn’t the first project I’ve used the Krylon Fusion for plastics, and I’ve been extremely pleased with the results each time.
So, maybe you don’t have a bouncing horse, but don’t overlook what a new coat of paint can do with any of your kids plastic toys. And, if you do have a pony who needs a makeover, just think of the possibilities! Krylon has a huge assortment of colors available that would be great for little girls or little boys, the possibilities are endless with a little imagination and creativity.
VOTING TIME! Please choose ONE!
Sadly, Stephanie from Always Just a Mom had to drop out. So we'll only be eliminating 2 this week.
SO EXCITED FOR THE FIRST ROUND OF THE COMPETITION! Good luck ladies! :)
ReplyDeleteExcited! Great projects!
ReplyDeleteWow, this was the hardest choice ever -- there were so many that I LOVED!
ReplyDeleteAwesome group of projects! Everyone did an amazing job! So sorry to hear about Miss Stephanie, she will be missed. Good luck to everyone!
ReplyDeleteWow, those are some amazing project! So excited for the first round. Good luck ladies!
ReplyDeleteWhat fun! I just voted!
ReplyDelete#4, the phrase "beaten up" is not grammatically correct. It's just beat-up. But I voted for you anyway because this is a craft competition, not a grammar one and you did great. :)
ReplyDeletelove that corner chair - where did you get that?!? I want one (post spray paint of course!)
ReplyDeleteOh my gosh it was very hard to pick just one! There are many great projects here!
ReplyDeleteWow! Everybody did awesome! :) Good luck, ladies!!
ReplyDeleteGinger @ gingersnapcrafts.com
These are all great! I wanted to vote for everyone. Good luck everyone!
ReplyDeleteSuch wonderful wonderful project ladies!!! I can't wait to see who came up with what!!! :o) it is an honor to be part of this competition with all of you!!
ReplyDeleteJaime
Wow, so many to choose from!
ReplyDeleteGreat projects, I'm so impressed! This is going to be a gooood competition all the way through!
ReplyDeleteGreat projects. I came over from one of the contestants' blog and since she couldn't tell which one was hers (I understand why), I won't ell which blog brought me here! *haha* Way to make it tough on a new vistor...everything looks AMAZING!
ReplyDeleteSome great thinking came into these projects! Hmmm!
ReplyDeleteOh. my. goodness! What a beautiful line up of projects, the transformations are incredible. This is a really tough choice! Good luck, everyone!
ReplyDeleteThese projects are totally awesome! I'm super excited to find out who created what! Good luck ladies! :D
ReplyDelete