
Time to vote for you favorite week 1 project! The theme this week is Trash to Treasure. Contestants were asked to use at least 50% "trash" in their project. Trash could some from the thrift store, their own trash, or someone else's trash. Scroll down through the projects and vote using the poll at the bottom! :) All projects are anonymous. Poll will be open through Wednesday at 11:59 pm Central time. Come back Friday to see the winners revealed! And follow along with OMTWI so you don't miss the rest of the competition this month! :)
Are you ready to try out for OMTWI?? Don't miss the Season 2 tryouts later this week!
Are you ready to try out for OMTWI?? Don't miss the Season 2 tryouts later this week!

Project #1 -- Anthropology Sandals
This challenge was especially hard for me because there are so many options. After going through all the alternatives in my head I decided to go with a project that I have been planning in my mind for awhile. The inspiration for my project were these flower sandals I saw at Anthropology. Whenever I am feeling I need a creative burst I check out their website.
 First I went to a few garage sales looking for items I might use on projects when I saw these old silver sandals. They were a little worn and a little boring but in overall good shape.
 For the second part of my project I went to the fabric store in search of some distressed leather. When I couldn't find anything I liked I looked at the vinyl. I was a little apprehensive but it was so cheap for the amount I needed I thought I would give it a try. The great thing is it worked beautifully. I just started playing around with the material trying to create different layered flowers. I also tapped into my supplies and used a few decorative brads that I had on hand. Finally I used my trusty hot glue gun to attach all the flowers to the shoes and an amazing creation was born. I think they look very similar to the Anthro ones and at a fraction of the cost. Original Dahlia Dear Wedges $168.00, my version $8. Talk about getting your money's worth with a little creativity and some old shoes.
Project #3 -- Utensil Wall Art
One area in my house in need of some much love is my kitchen. I have been trying to convert our rustic home to a more open, shabby, chic feel. So I combined multiple thrift store finds into one great project to fit my new vision!

I took three frames which were gold-licious in color (not my style), 27 vintage utensils, and my lovely upholstry remnants and I made a fun wall art project for my kitchen.

Project #4 -- Tabletop Mantel Decor


 First I went to a few garage sales looking for items I might use on projects when I saw these old silver sandals. They were a little worn and a little boring but in overall good shape.
 For the second part of my project I went to the fabric store in search of some distressed leather. When I couldn't find anything I liked I looked at the vinyl. I was a little apprehensive but it was so cheap for the amount I needed I thought I would give it a try. The great thing is it worked beautifully. I just started playing around with the material trying to create different layered flowers. I also tapped into my supplies and used a few decorative brads that I had on hand. Finally I used my trusty hot glue gun to attach all the flowers to the shoes and an amazing creation was born. I think they look very similar to the Anthro ones and at a fraction of the cost. Original Dahlia Dear Wedges $168.00, my version $8. Talk about getting your money's worth with a little creativity and some old shoes.
Project #2 -- Monogrammed Tray
For the first week we were told to "Turn Trash to Treasure". This theme was hard for me. My main craft tends to be sewing but I don't want to sew every week of the challenge, so I chose week 1 to branch out! A week ago we tiled the backsplash in our kitchen leaving lots of extra tile and grout. Once I realized I wanted to use the tiles for this project I quickly sent my husband to dig them out of the garbage before they became buried under diapers and banana peels!
 Yeah! first step down, now what to do with the tiles? I loaded up the fam, and off to the thrift store we went. I had a few ideas in my head, and thrift store 1 did not have anything to go with any of those ideas! My ever patient husband helped me pack the kids back up in our negative degree weather and off we went to Thrift store #2. And there she was, the ugliest, most hideous tray I'd ever seen.
 Next came the fun! Spray painting the tray, breaking the tiles (carefully!! under a towel so the glass didn't fly!), gluing down the tiles, and grouting.
 The tray has many purposes and is so fun!


Project #3 -- Utensil Wall Art
A few months ago I found a stack of upholstry remnants at the thrift store. I have been racking my brain with what I should do with the "tall" stack that I brought home. I made a few purses, BUT you can only make sooo many purses before they loose their thrifty fun"ness."

One area in my house in need of some much love is my kitchen. I have been trying to convert our rustic home to a more open, shabby, chic feel. So I combined multiple thrift store finds into one great project to fit my new vision!

I took three frames which were gold-licious in color (not my style), 27 vintage utensils, and my lovely upholstry remnants and I made a fun wall art project for my kitchen.

Simple. Chic. Cheap.
Project #4 -- Tabletop Mantel Decor
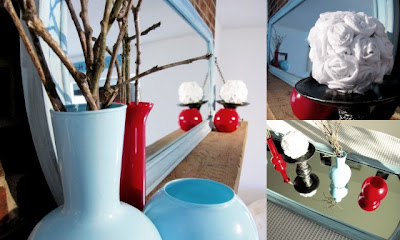
I had a hard time deciding what to make for the trash to treasure theme. Then I remembered the mirror my father-in-law gave us when we were first married. He has some mad thrift store skills, so I'm sure that's where this came from. It wasn't new at any rate. I've been dragging it around, knowing someday I would find the perfect opportunity to refinish it.

The day finally came. I went out to the shop to grab it and it was covered in mouse droppings. Talk about trash to treasure! Not to worry, I broke out every sanitizing product I had and got it cleaned up in no time. The rest of the project came from the thrift store {pictured below the mirror}.

I painted the glass vases. I glued the plate to the stand thing {which actually turned out to be a perfume bottle} and painted that. I also used some faux leafing to make it look metallic. The rosette ball I made using old newspaper and a thrifted sheet. The rest of the sheet I used to glaze the mirror after I painted it. I also grabbed some sticks from my yard to throw in the tall vases. I love the color it adds to my mantel!

Project #5 -- Vintage Inspired Play Canisters

When I heard the theme this week was Trash to Treasure, off I headed to the thrift store in search of some...er...trash.
I found a small collection of wooden salt and pepper shakers and a wooden canister and it hit me-make some vintage-inspired play canisters for our play kitchen!


I added some wooden knobs and spray painted them-then painted the words and flowers by hand. That was nerve-wracking to say the least. ;) I'm not much of an artist but they came out pretty darn cute, and bonus: they make me want to get in the kitchen to bake some cookies! Happy day for everyone!


Project #6 -- Play Castle

I found an old pack and play being thrown out and a thrift store pillow shame. We also had some pieces of culvert laying around our yard. I took these things and they became....

A play castle!!
I bought a kind size sheet and made a slip cover for the main part of the castle, I used some scrap pieces of black canvas I had on hand to make bias tape to trim the door and windows. I took the pillow sham and made it into a slip cover for the bottom of the pack play. The brick pattern of the pillow shame worked great for this!

I took the culvert pieces, which was already 3' long, and painted them a dark gray to match the main part of the castle. I then cut the back of the culvert the whole down then slipped it onto the front corners of the pack and play. I finished the towers off with a little red roof on the very top.
I them made two red flags out of scrap red fabric and a dowel rod. They are attached to the top of the castle by fitting into a grommet I put into each of the front corners. The draw bridge is made out of a scrap piece of ply wood that was being thrown out, I painted it gray to match as well.
Lastly I cut out the sides of the pack and play, which was already ripped, and made a pair of curtains for both windows. The curtains really work! They are hung up using a dowel rod that sits in the top grooves of the pack and play on the inside.
It is very much enjoyed!

I was so excited to hear this week's theme was Trash to Treasure! I immediately knew I wanted to use this bamboo in some way and I finally came up with this! This unique Outdoor Bird Nest Lamp gives off just the right amount of light without interrupting the outdoor experience. It is composed of a table umbrella stand that someone was throwing away (aparently the umbrella pole had broken off inside which was a challenge to remove), some bamboo that someone else had cleared out from their yard, and a light kit I picked up a few years ago and hadn't found the right use for until now.

The nest is made from twigs and sticks. I have a small round basket between the branches and the bulb to help me get that round shape and prevent any fire risk. I used some string at the beginning by bending and tucking branches and tying into place. (I have a new found respect for those busy mama birds who can whip a nest out sans string!)


Project #8 -- Sweater Purse
When I think of a thrift store I think of a lot of clothes. It always seems like that is what the majority of a thrift store is. As I was walking through the isles of the local thrift store I came across this yellow sweater. I love the color yellow – so I decided that I would use this for the majority of my project. And it was 50% off – score! I went through my friends goodwill pile and got a bunch of misc pieces of fabric. It was then that I decided I would make a sweater purse. I’ve seen sweater purses out in blogland, but I wanted mine to be a little bit different. I decided that a slight banana shaped purse would be perfect for this yellow sweater. I bought my handles from JoAnn’s to help give it a somewhat classy look.

I cut out all of my pieces and then pinned and pinned and pinned some more. This was crucial to help the sweater keep it’s shape. I added a few pockets to the inside because those are important in any purse. I also used a little bit of interfacing to help the sweater hold the banana shape. Because I decided to use circular handles I used a simple magnet clasp to hold it closed.

Of course this purse would not be complete without a little accessory, and what better than a rosette from same fabric as the ruffle fabric on the top. It adds just that perfect finishing touch. Voila! There you have a simple, casual and easy going purse.

Project #9 -- Frame Clock


Project #10 -- Meet Marj

Mannequin: All Re-purposed Junk
What do you get when you cross 4 feet of foam, 3 empty juice bottles, 2 toilet paper tubes and 1 broken floor lamp?
A pile of junk, but dress it all up in a snug denim shirt, an itchy bra and a worn out belt and MARJ is ready to party!

I really wanted a dress form but they are pretty cost prohibitive. The trash to treasure challenge provided me the opportunity to upcycle these cast offs into something useful.
Using the juice bottles as a core, I added layers of foam to match my dimensions. Next came her undergarments: a bra I can't stand (stuffed with floral foam and plastic shopping bags) and a past it's prime belt to cinch her waist.
One look at the stained and preshrunk gap shirt at the thrift store and I knew it would be snug and unflattering on me... in other words: perfect! I altered it slightly to act as Marj's skin. Her shoulders were shaped last using toilet paper tubes half covered in more foam.
Finally I pinned her shut (so I can adjust her size should I change slightly in the future). I removed the electrical wires from the lamp and converted the top portion into a finial by hot gluing it to one of the juice bottle caps. The lamp pole simply slides through the spouts of the juice bottles and the finial is attached at the neck to hold it in place.
In total she cost $12: $6 for the foam and $2 for the shirt at the thrift store. $3 for a roll of duct tape and $1 for the floral foam shapes that fill out the bra. The additional piece of denim was left over from a reupholstering project and the bottles and tubes were in my recycling bins. The bra and belt had been on their way to the trash.
The biggest deal is I now have a pin-able dress form that is exactly my size! Time to make myself a new wardrobe!

Project #11 -- Play Table to Toddler Bed
This first week's challenge was so much fun! I went straight to the DI and was SUPER lucky to find a majorly trashed toddler play table! It sparked a very fun (and soon to be needed) project! So, without further ado; I give you: The (Trashed) Toddler Play Table to Beautiful Toddler Bed By Night and Learning Center By Day!


To begin this make over, I spray painted the table and little stool a pretty light blue. I also removed the (very ugly) rope drawer pulls and plugged the holes with wood filler. After it had dried, I (ok my hubby) attached the pretty new drawer handles I had picked out. (Thanks babe!)
To make this work as a bed, I had to make a mattress. I did this by stuffing two body pillows into a mattress form that I made using thrifted sheets. Velcro makes for easy removal and cleaning of the mattress form. I also used thrifted sheets to make the bedding set and a thrifted pillow to make the "E" accent pillow. The star is corduroy that I had in my stash.


To make the learning center, I painted one side of the table top with chalkboard paint and glued a map of The United States on the other. (I plan to homeschool, so I figure this will be a fun, easy way to get started with geography early. Plus it makes for a nice "train" background, don't you think??) :)


I love this new little bed/playtable!! And I love that it saves a TON of space!! The fact that the mattress can also be a soft base for playing isn't a bad thing either! No cracked heads = a very good thing! The possibilities for play on this table are endless! Legos? check. Trains? Check. Painting? why not? Really, it's just the perfect space and size for my little monkey!
Project #12 -- Chair Transformation
I found this chair on the side of the road last May. It's been sitting in the garage, collecting dust since then.

When I read the specs for the first challenge of One Month to Win It, I knew this chair would be the perfect candidate. Rather, I knew this chair's only chance of getting a makeover any time soon would me this challenge. Despite having no seat and having a pretty nasty paint job, I could see this chair had great potential. Sadly, the backing couldn't be saved. It was made from what appeared to be cardboard layers and they'd begun to separate and tear.


The first step was to remove as much of the peeling paint as I could. I scraped first and then sanded. Next, I gave the chair a coat of stain so that it would show through once I distressed the piece. After that, it was time for paint and distressing. (While I was doing all of this, I had my hubs make the seat and back boards from some scraps of plywood we had out in the garage.)
Once the frame of the chair was finished, it was upholstery time, which is something I've never done before. I ended up using a drapery panel that matched the drapes of the room the chair would be living in. Since I wanted a really cushy seat, I decided to use a foam cushion wrapped in batting instead of just batting alone. One the pieces were upholstered, I installed them in the chair frame.
Here is the finished chair looking a bazillion times better. Now, she gets to live inside, instead of out in that dusty ol' garage.


TIME TO VOTE! Vote for your fave project below!
Come back Friday to see the winner!
WOW! Great work everyone! Voting was NOT EASY but I finally was able to pick one that I liked a teenie bit more than the others!
ReplyDeleteI knew THE one as soon as I saw it! GORGEOUS!
ReplyDeleteHey, absolutely beautiful, amazing creativity.
ReplyDeleteThis might the be the first time I didn't have a "hands down" winner right when I saw it. I wanted to vote for like FIVE of them!! Great job, everyone!
ReplyDeleteI had a horribly hard time just choosing ONE to vote for. They are all SO inspiring! The chair, the silverware framed, the clock, sweater/purse, marj, tray, canisters, etc! Gosh is it going to be THIS hard to vote each week??
ReplyDeleteGood luck to all!
i loved the play canisters! Next choice was the toddle bed...great job, everyone! SHEESH!
ReplyDeleteHoly cow! Those were awesome! Great job ladies!
ReplyDeleteAmazing projects! I can't believe the creativity! The mannequin idea - how original and resourceful! I loved the toddler bed too!
ReplyDeleteI like your projects. The clock was fantastic. A person could go to a thrift store and find frames or even the dollar store. You could even mount it over a mirror and have the mirror as the back of the clock. then the craft store carries parts for a clock or at a thrift store they might have an old ugly clock to work with. Thanks for all the projects.
ReplyDeleteDid you know one of the spoons you have is a $20 spoon? Makes me cry because I need that spoon to finish a set I bought at a vintage sale but I can't afford it.
ReplyDeleteIt looks like it is part of the Michangelo collection at Oneida
But I love the frame clock! Love it!!!
Did you know one of the spoons you have is a $20 spoon? Makes me cry because I need that spoon to finish a set I bought at a vintage sale but I can't afford it.
ReplyDeleteIt looks like it is part of the Michangelo collection at Oneida
But I love the frame clock! Love it!!!
A pink round bassinet with pink decorative bed linen can really look stunning any time of
ReplyDeletethe day or night. This allows your babies to sleep close to each other without clobbering or rolling over each other.
Though this article might be of great help in your decision to buy a baby bassinet, try to find out more on baby bassinets by reading reviews and
other articles on the internet.
Also visit my web blog :: wiki.insidebci.com
Hi there! You some form of professional? Nice message.
ReplyDeleteCan you tell me easy methods to subscribe your weblog?
Feel free to visit my blog - how to increase chances of getting pregnant
A fake watch is never an exact replacement of a designer or branded watch.
ReplyDeleteAlso a person can buy varied amounts of vouchers, so it can be ten
pounds worth or fifty pounds worth depending on what one
wishes to spend. The band is made up of a white gel strap with
a stainless steel buckle clasp.
My homepage; armani exchange watches :: ::
How did you attach the utensils to the fabric?
ReplyDeleteHow did you attach the utensils to the fabric?
ReplyDelete